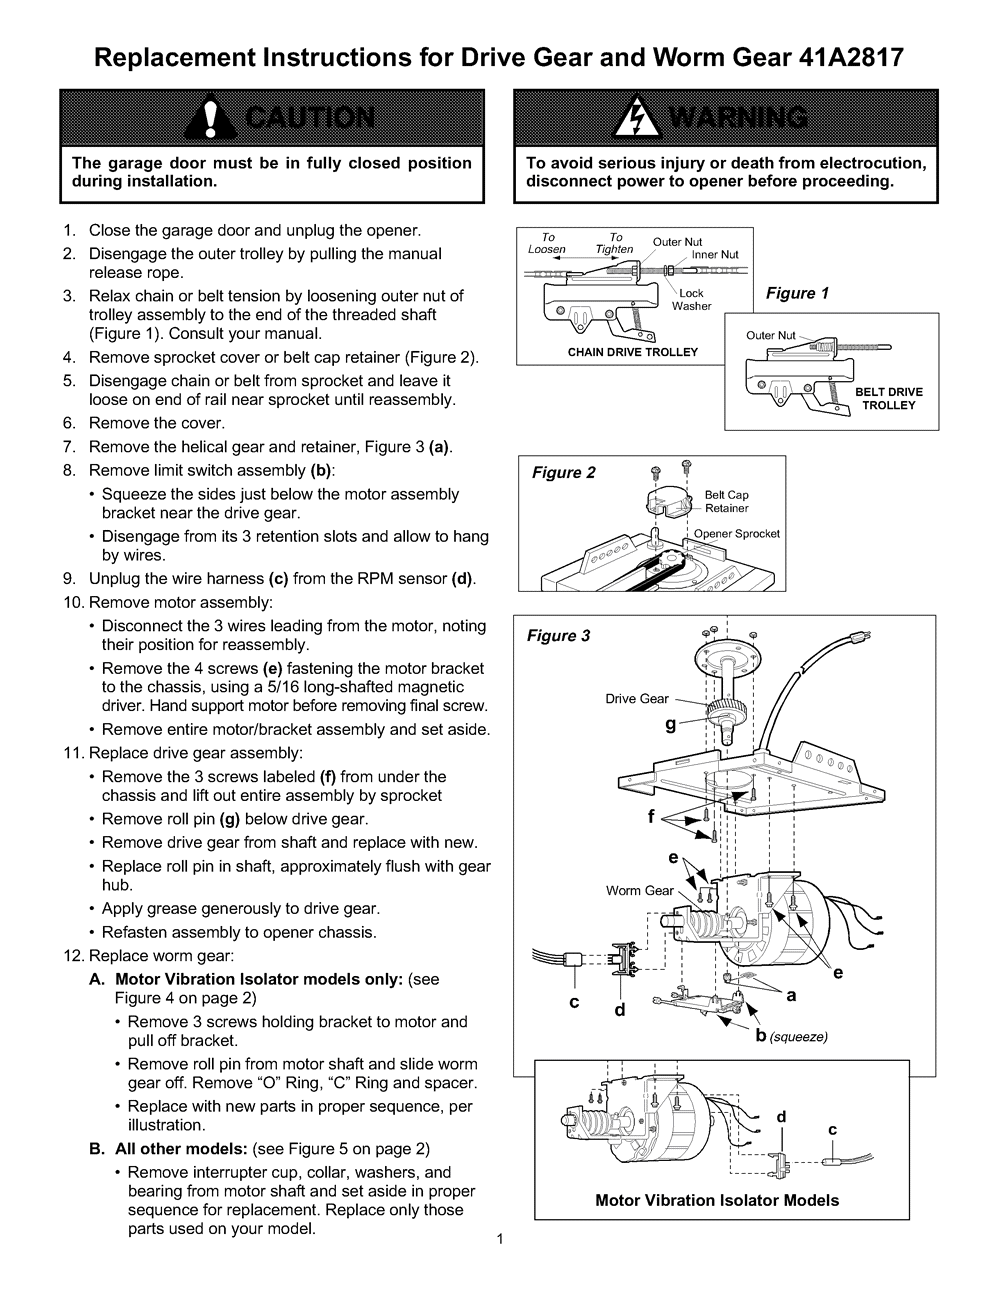
Gear
replacement in a Sears (Liftmaster) garage door opener, using the
Liftmaster gear kit 041C4220A
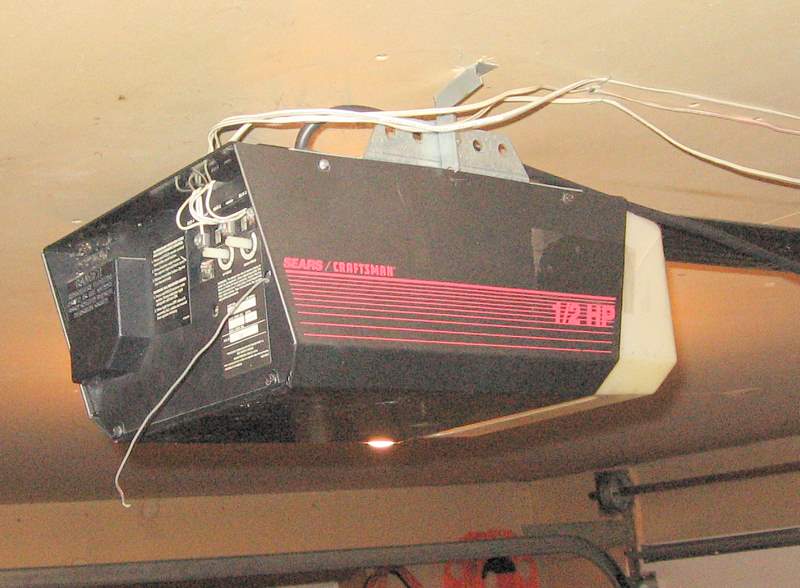
Sears garage door opener model number 139.53628SRT (need a cheap remote for it?)
http://tinyurl.com/stripgear
Recently my Sears garage door lifter would run and the door did not go
up. The motor just kept running until you hit the button again.
I figured it had finally worn out a gear. Reading on line, I
found it is pretty easy to find the parts, and the repair did not sound
too bad. Now that I have done the gear replace, I realize you could
do it pretty quickly if you have enough room over the garage door lifter
box to remove the screws on top and lift the gear and shaft out of the
top. But in my case the motor is too close to the ceiling, so I had
to take the entire motor down. After I got it apart, I thought I
should take pictures and post this "how to", so most of the pics are
putting it back together. But you can still see how to get it apart.
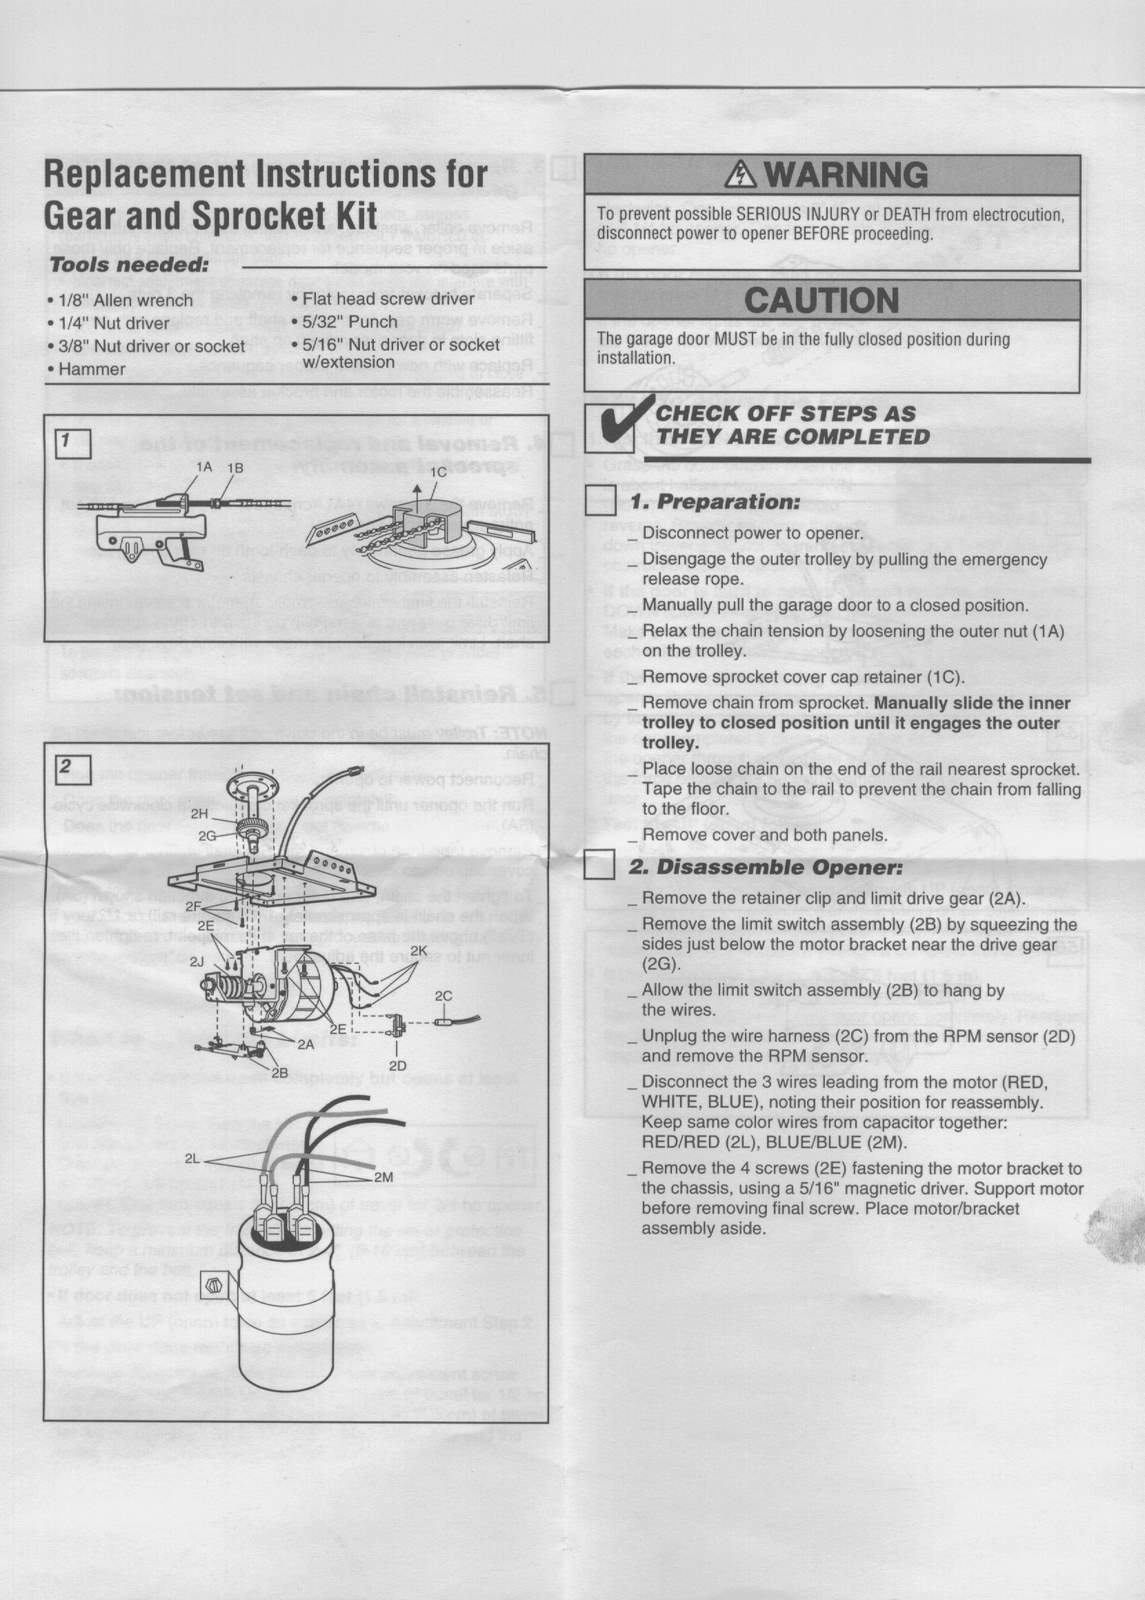
The actual printed instructions that come with the gear kit are scanned in
at the bottom of this webpage. Scroll down. And the gear kit
itself is easy to find online, do some price comparison shopping though,
and if you buy it from a local supplier you have someone you can go back
and ask questions of. The online prices will give you an idea what
to expect to pay. Search for the liftmaster gear kit 041C4220A (or
41C4220A).
I put the scanned
in instructions for replacing just the 41A2817 gear at the very
bottom of this web page.
On
with
the repair!
Unplug the thing. When inside take care to not damage the circuit
board, try not to let a tool touch it. The capacitor still has a
charge even though you are unplugged.
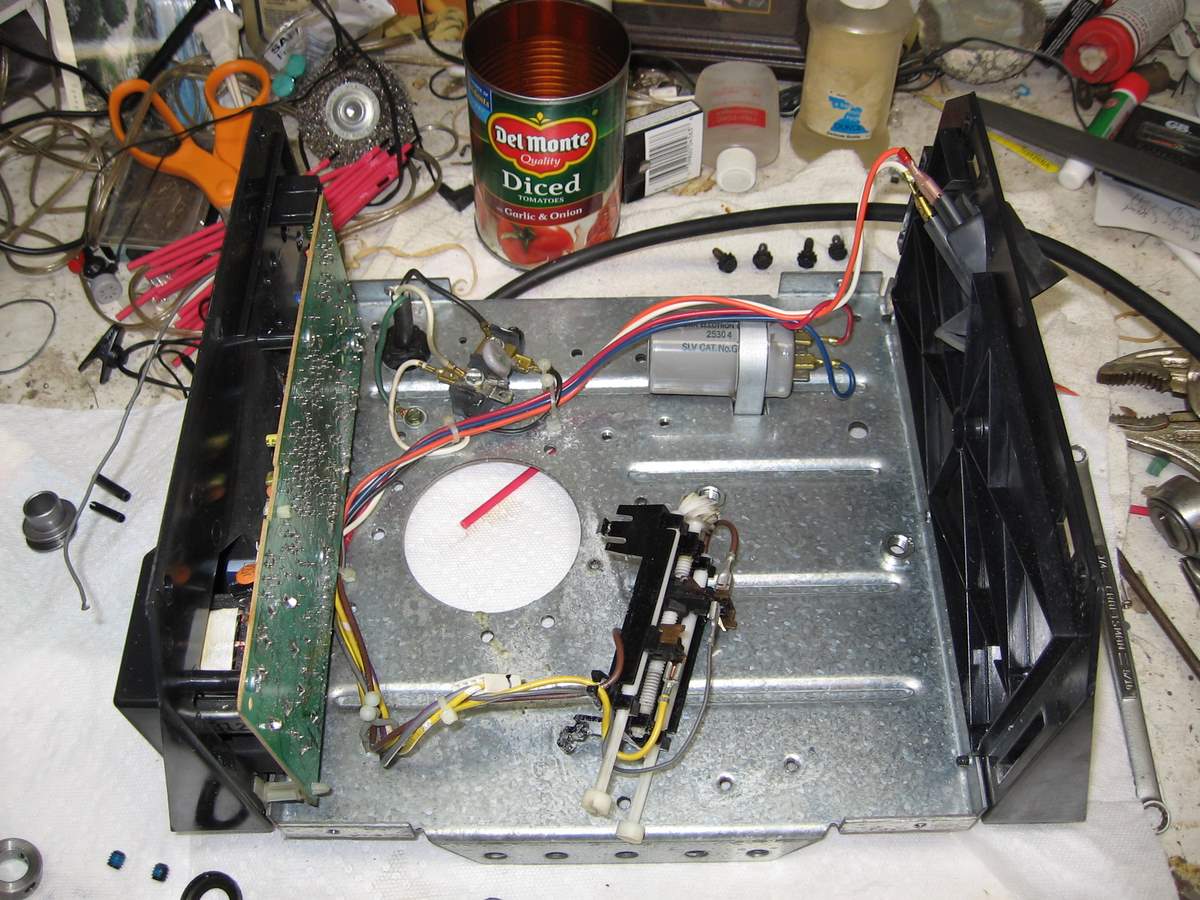
When you take the cover off the bottom of the garage door opener box,
your gear may look like mine. Lots of white plastic shavings from
the stripped gear.
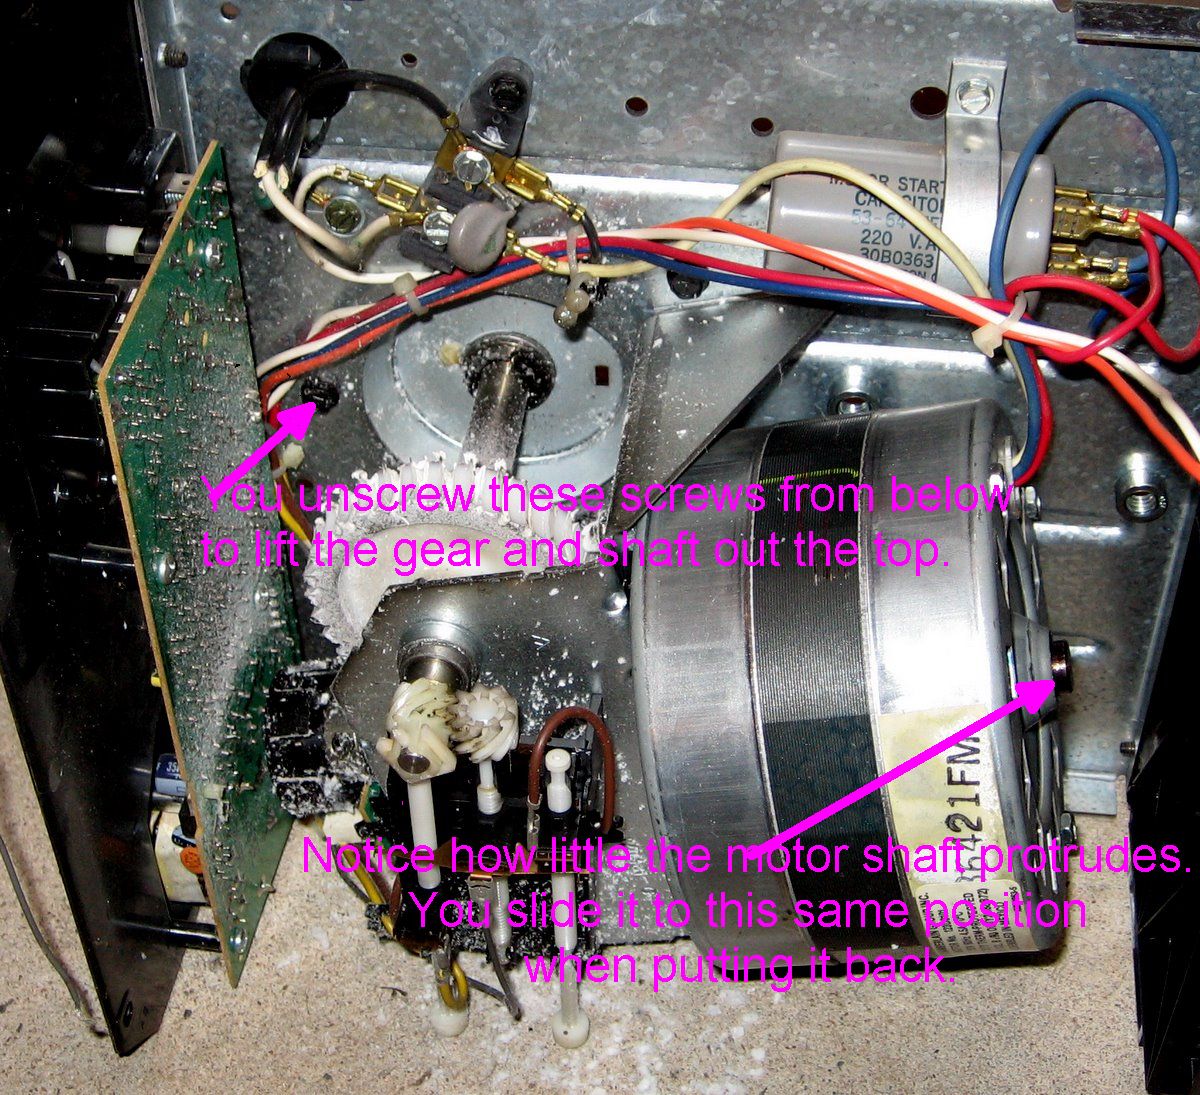
You will see three sheet metal screws on top of the lifter case
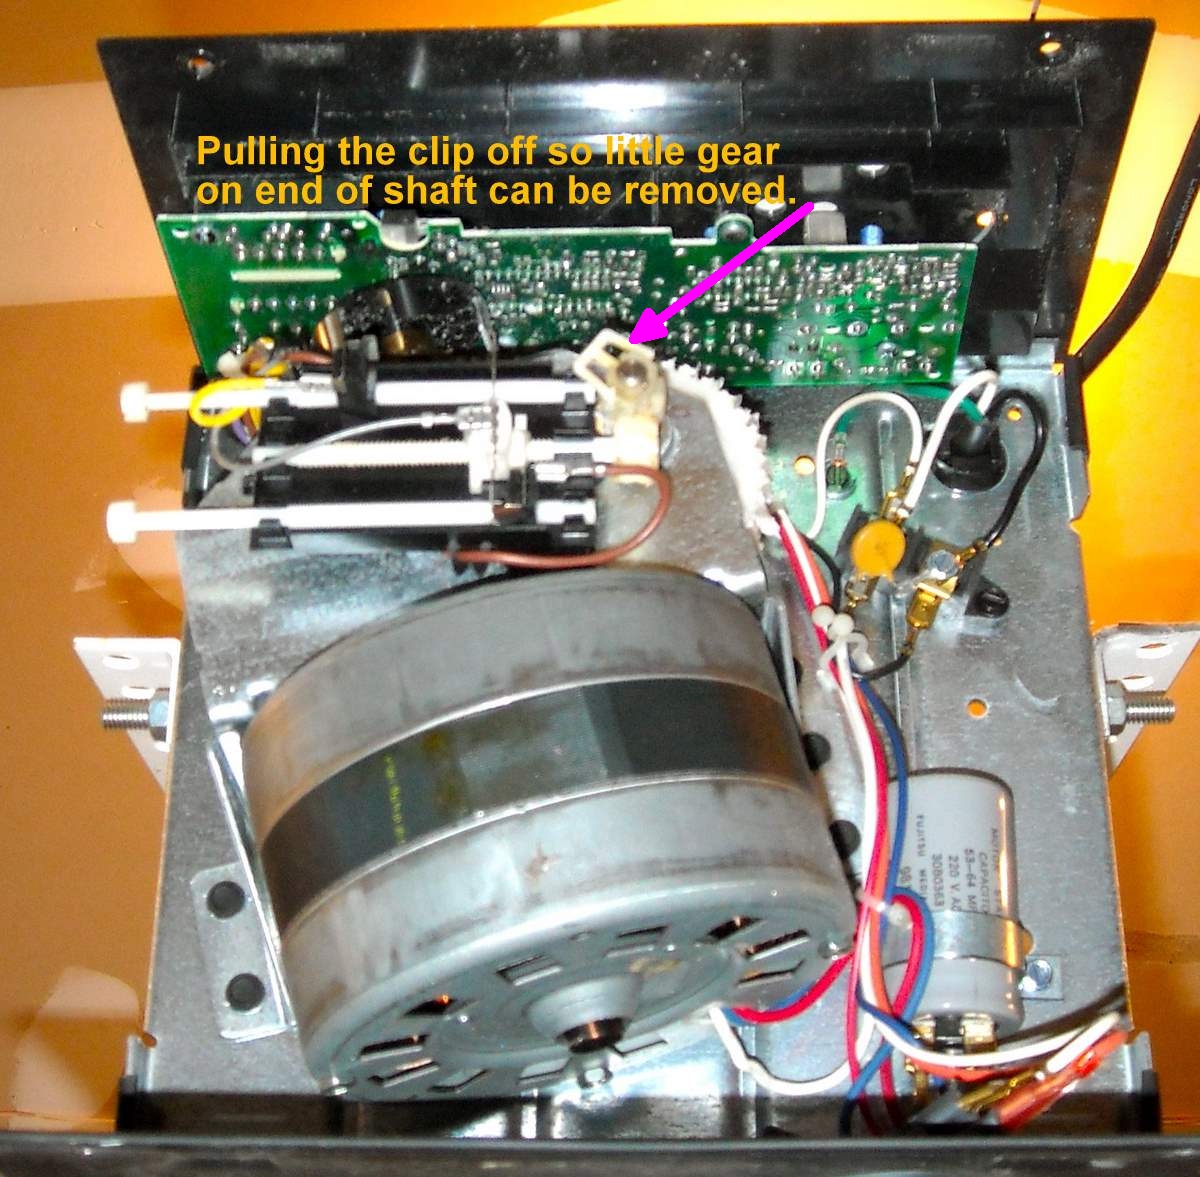
that hold the whole gear assembly in place. Look on top, where the
chain sprocket is. They unscrew from inside (below). But you
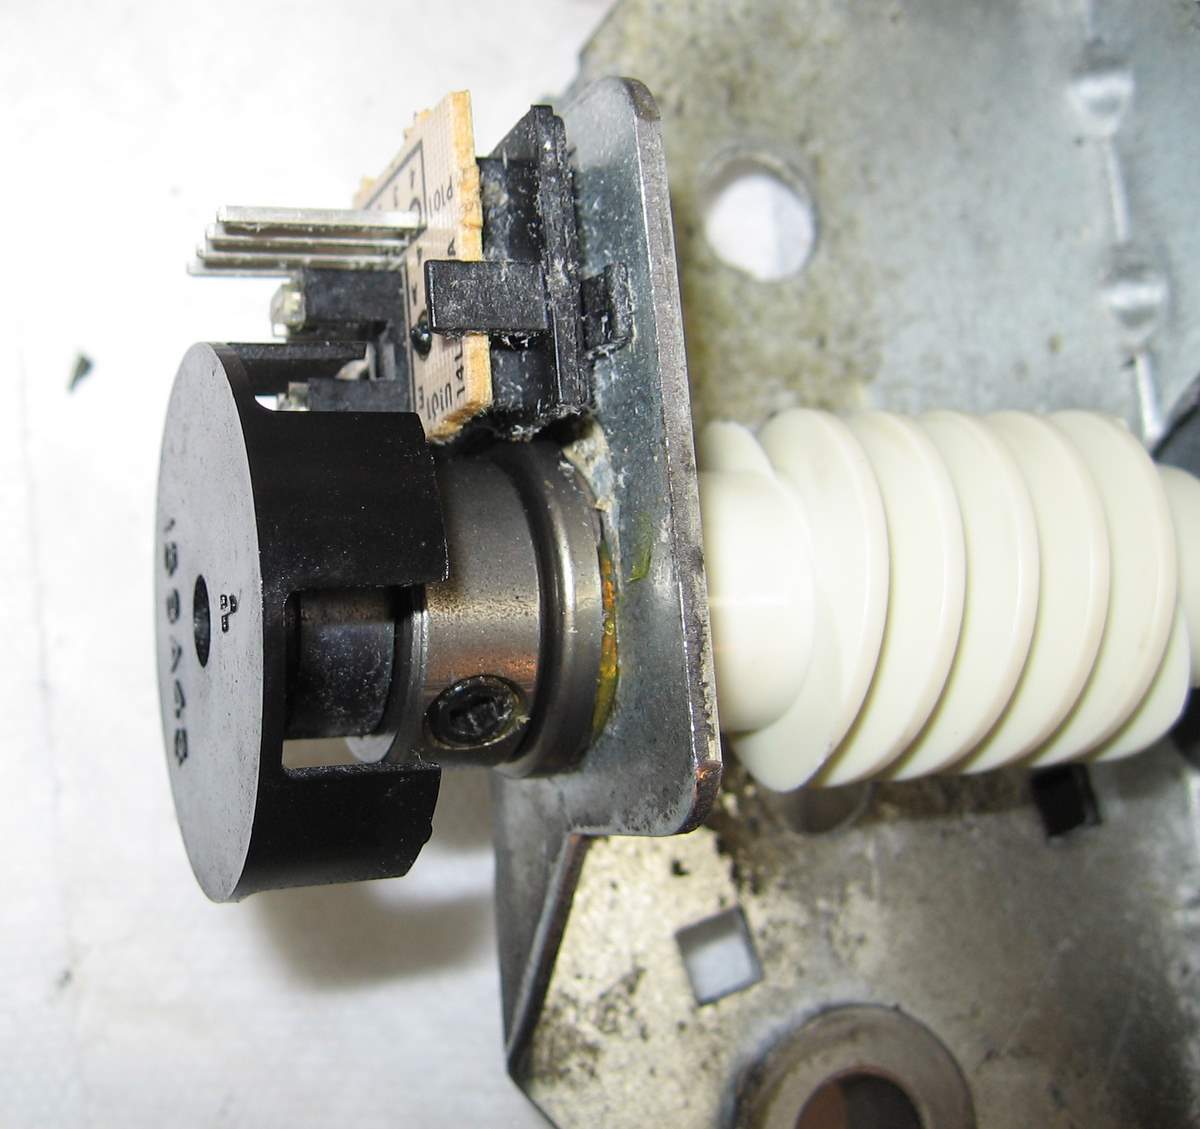
can't pull the gear and shaft out of the top until you remove the little
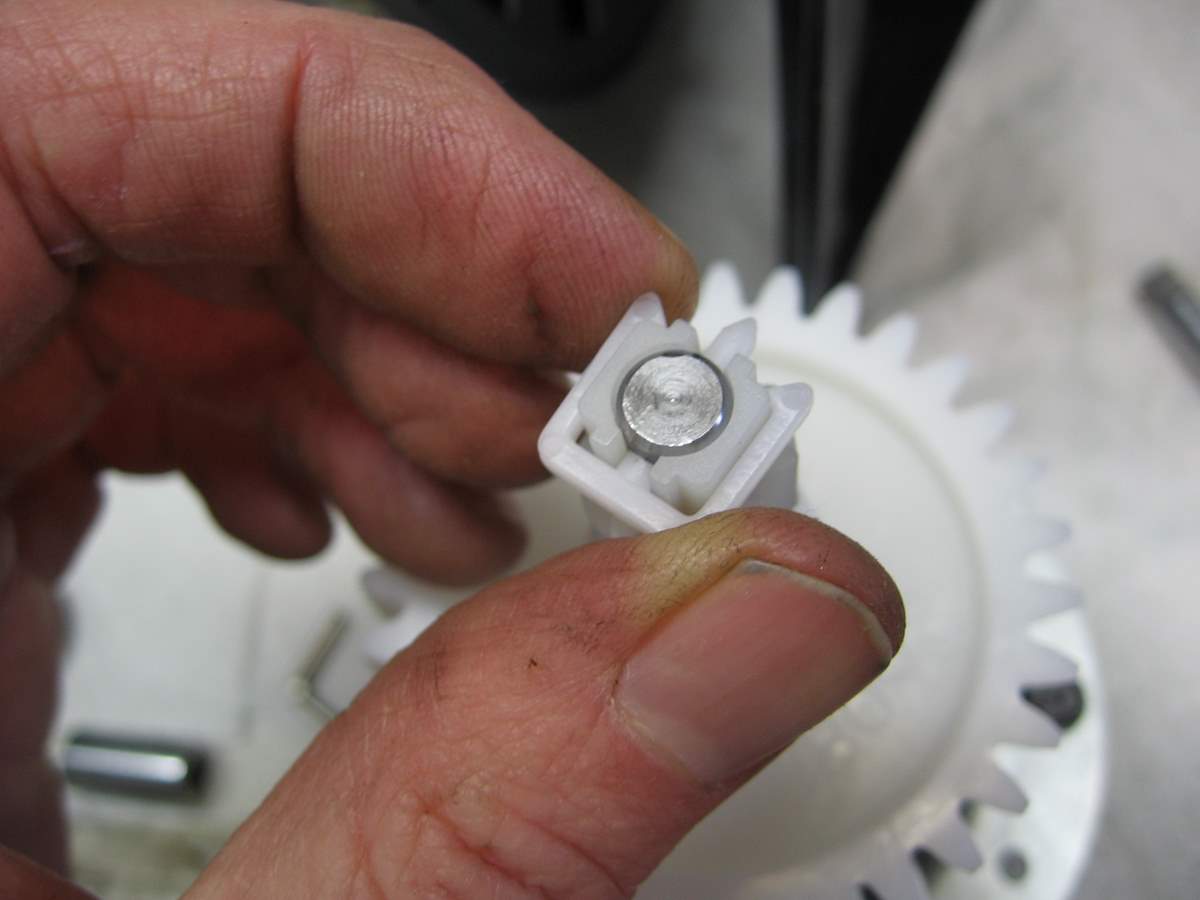
plastic snap on retainer on the end of the shaft. Close up of old
one, and new one going on below:
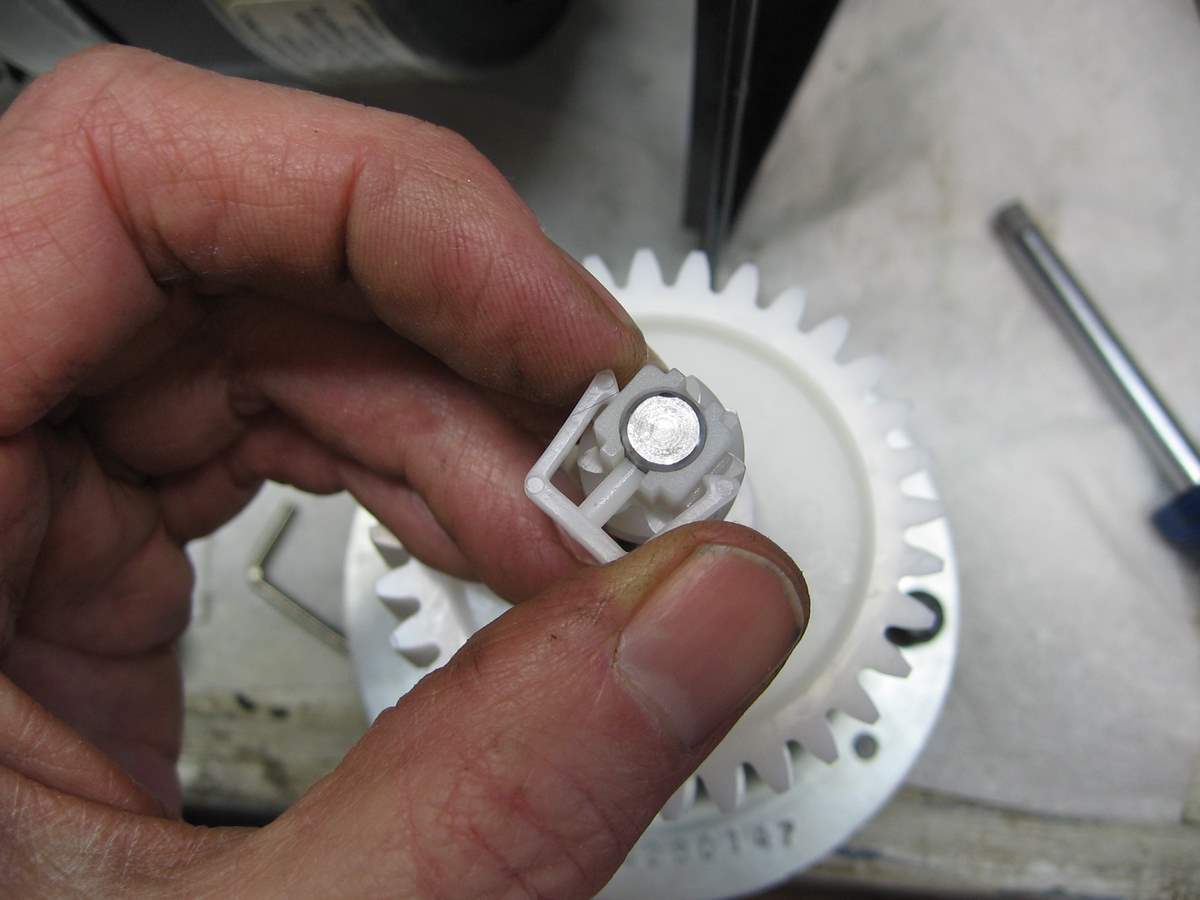
Here are the pics putting the new on, so you can figure out how the old
comes off:
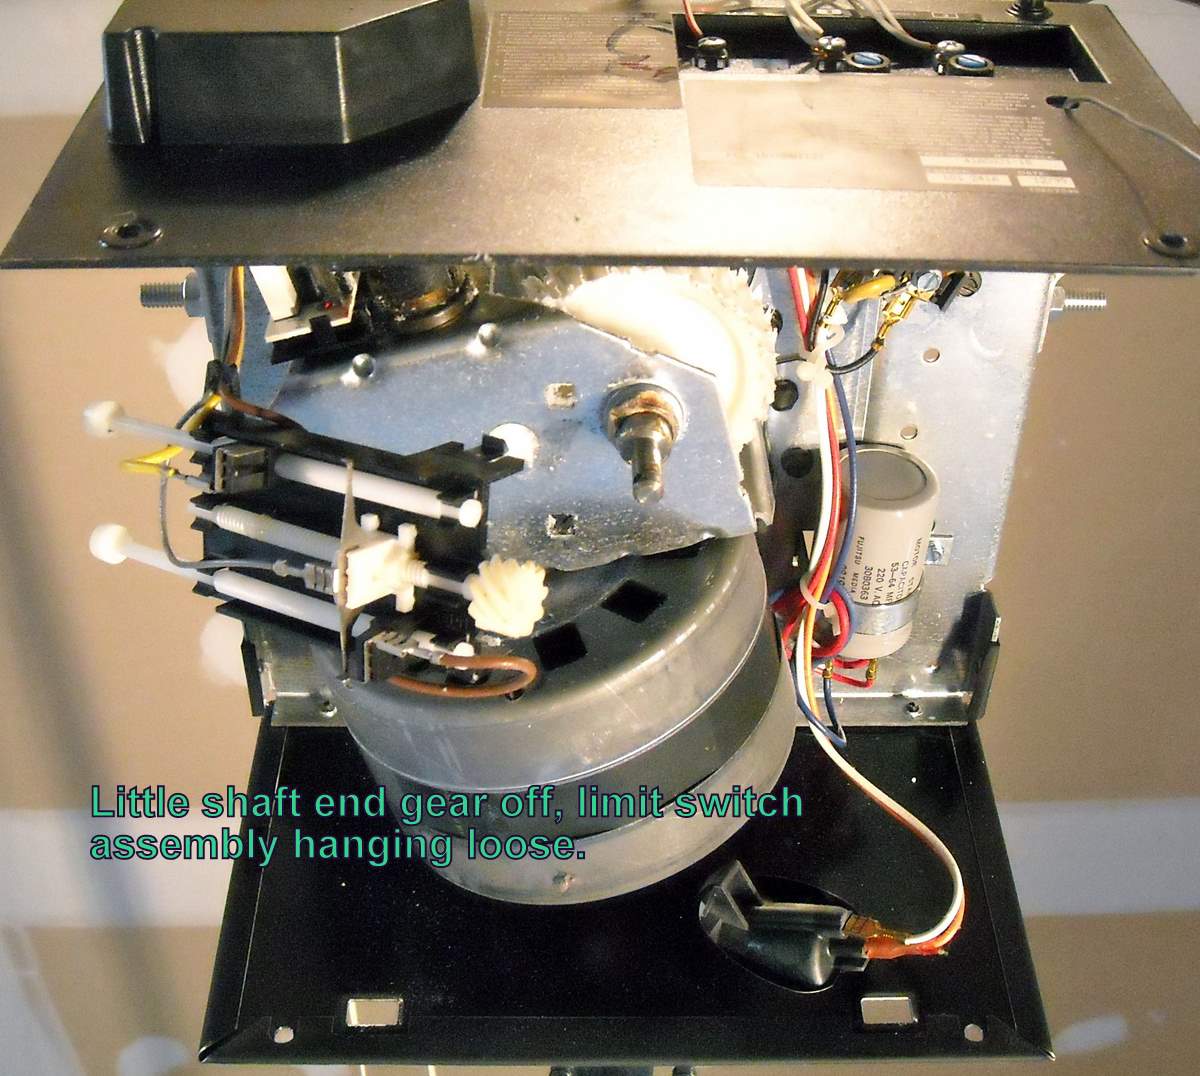
Once you get that clip off, and slide off the little white gear, you can
lift the whole chain sprocket, and the shaft with the stripped white
gear out the top.
Again, here it is, pictures taken during the reassemble so the parts are
all clean and new, but you can see how it lifts out:
In pic below, little gear on end of shaft is off, and you can then slide
the whole assembly out the top :
Below, pulling assembly through the top:
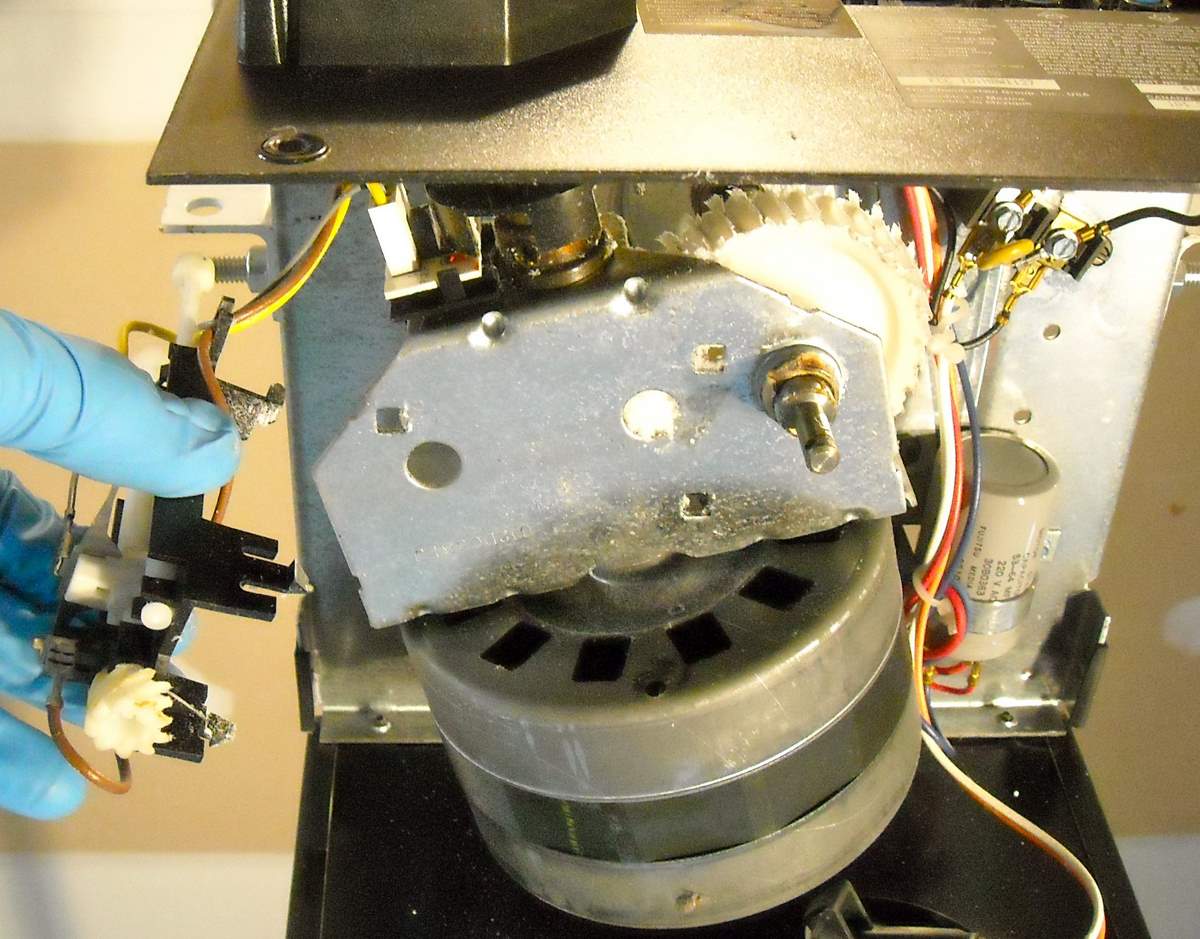
Here is the assembly out in my hand (below), but this pic is
misleading because I had put the little white gear and clip back on,
they would be off right after removal of course. And the sheet metal
screws would not be in the metal plate, you removed those to get it out
of the top. (You get new ones with the new assembly, they even give you
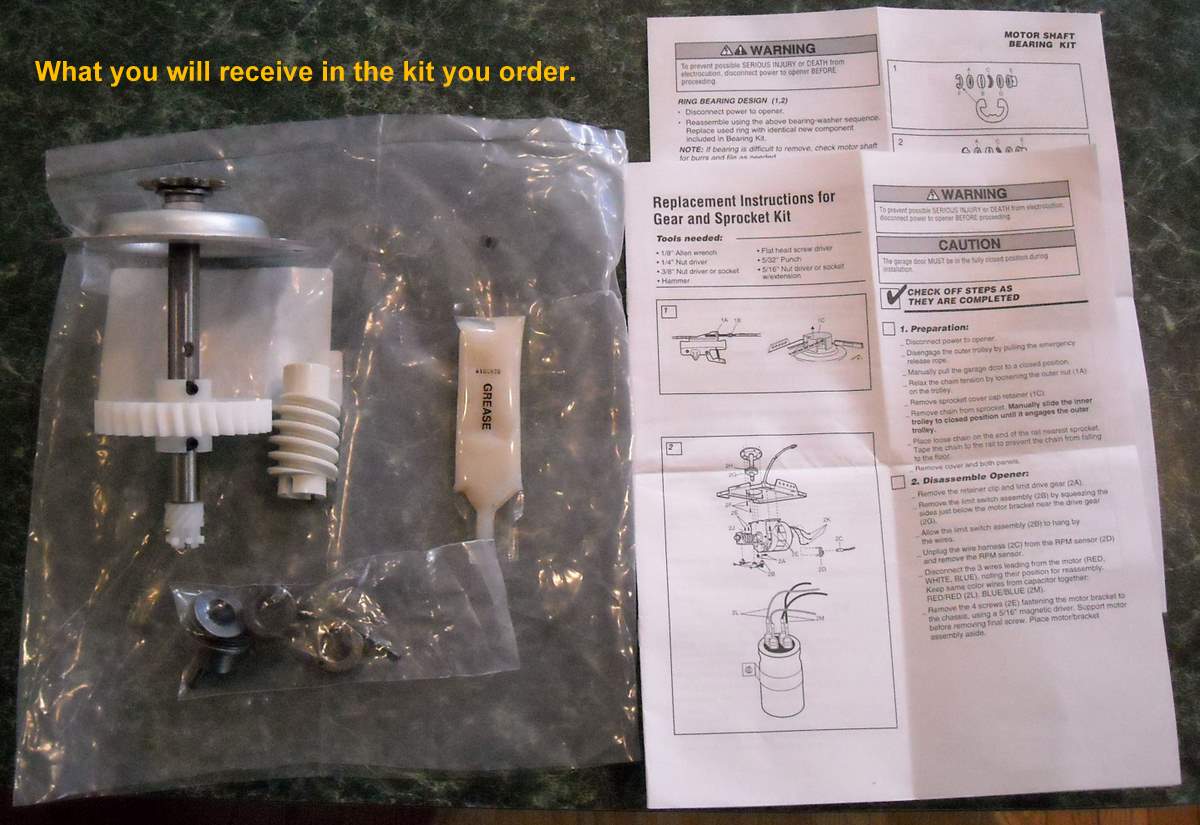
the proper grease and pretty good instructions.)
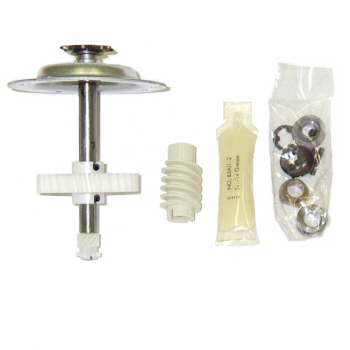
This whole assembly is the 041C4220A, includes everything
you need, and the large plastic gear is already on your shiny new shaft.
You only save about
$10 if you just buy the large white gear (part # 41A2817) but I
didn't have much luck trying to pound out those "roll pins" that hold it on. You see
them in this picture. So get the 041C4220A and you get both
gears, the little bearings (look like washers), and a new shaft and
chain sprocket. This repair kit is FOR CHAIN
DRIVE MODELS ONLY. If you have a belt drive model see part number 41A4885-2
or 41A4885-5
This (below) is the 041C4220A. Also try looking for same
part number without the leading zero, "41C4220A".
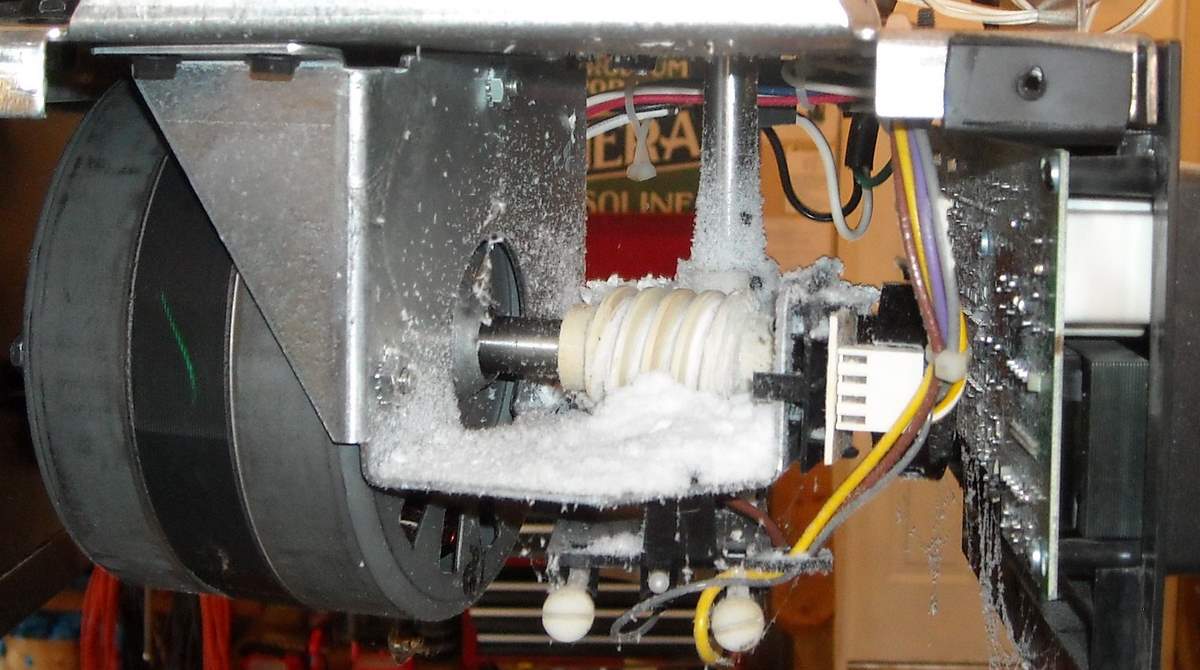
So you could just put in the new assembly at this point, and re-use the
old worm gear (the long white gear on the motor shaft that is
still in your opener at this point). My worm gear didn't look too
bad, but I replaced it anyway, since the kit includes the gear and
everything you need to replace it. But
if it looks good, leave it, it gets a bit more complicated to replace
it too.
Again, if you just need to
replace that big white gear, the shaft and chain sprocket, you
could just drop in the new one at this point, grease up the gears real
good, and you are done. Pretty easy!
If you want
to replace the worm gear and the bearings on that shaft, then
continue on....
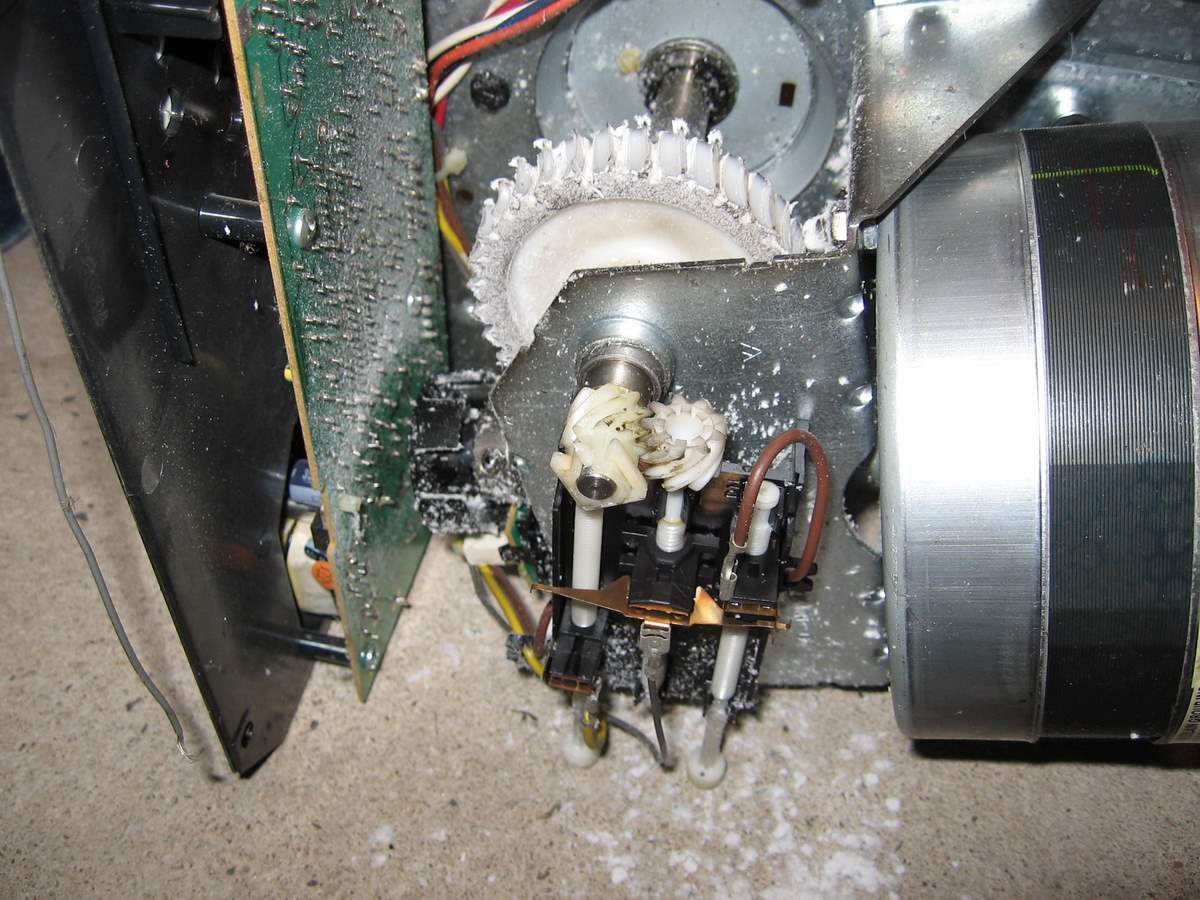
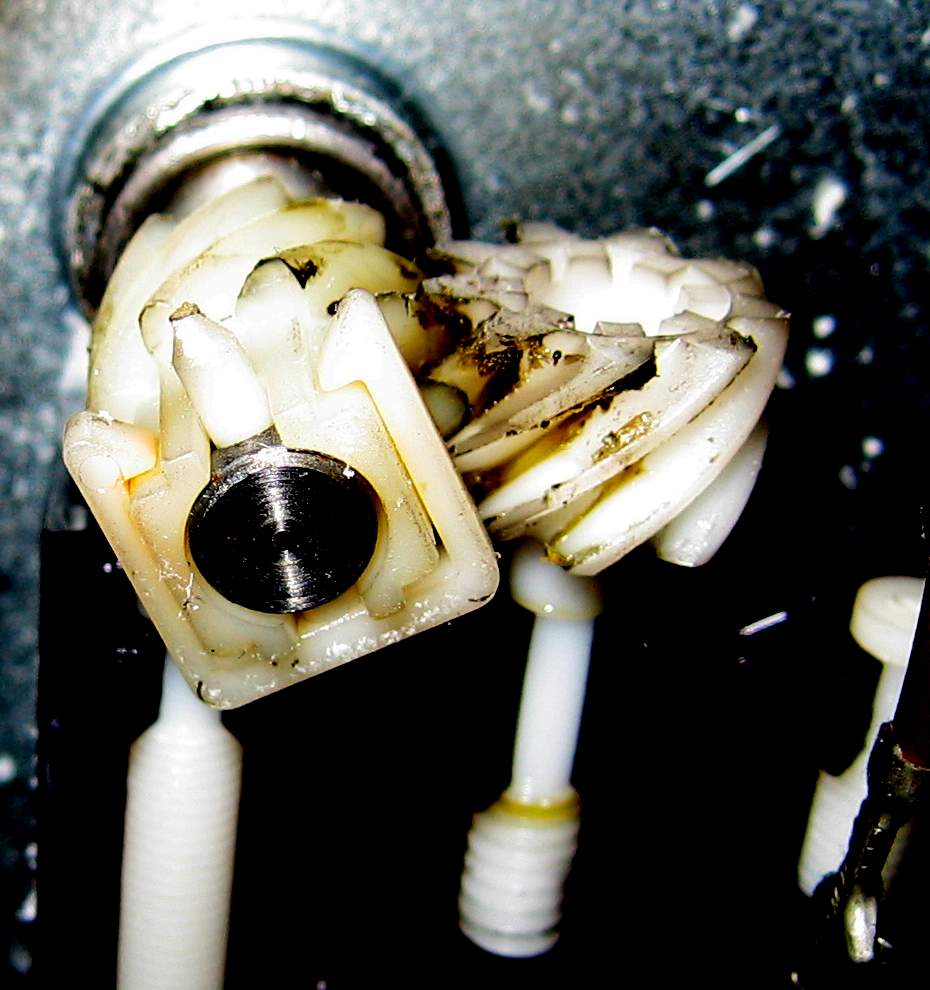
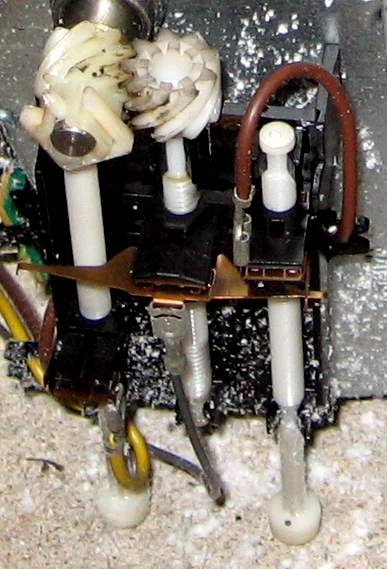
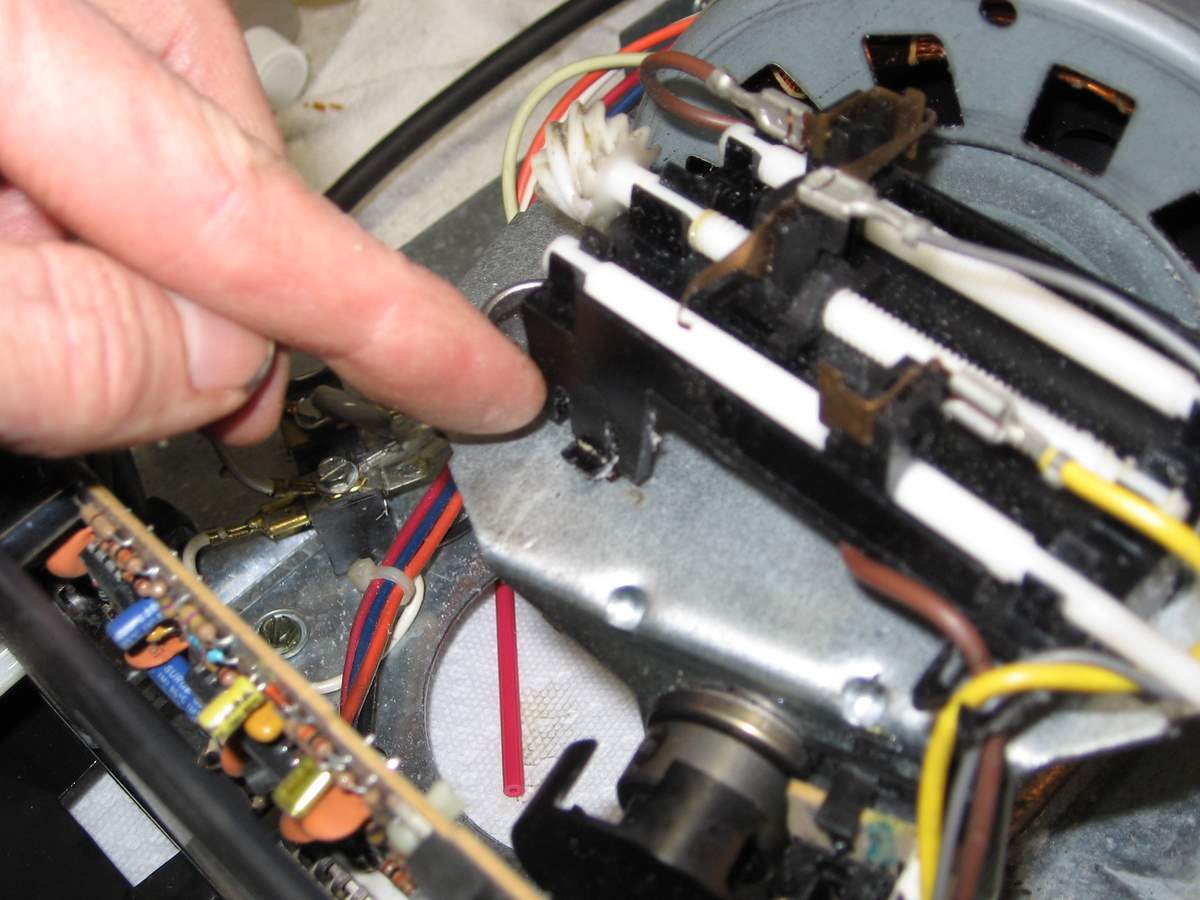
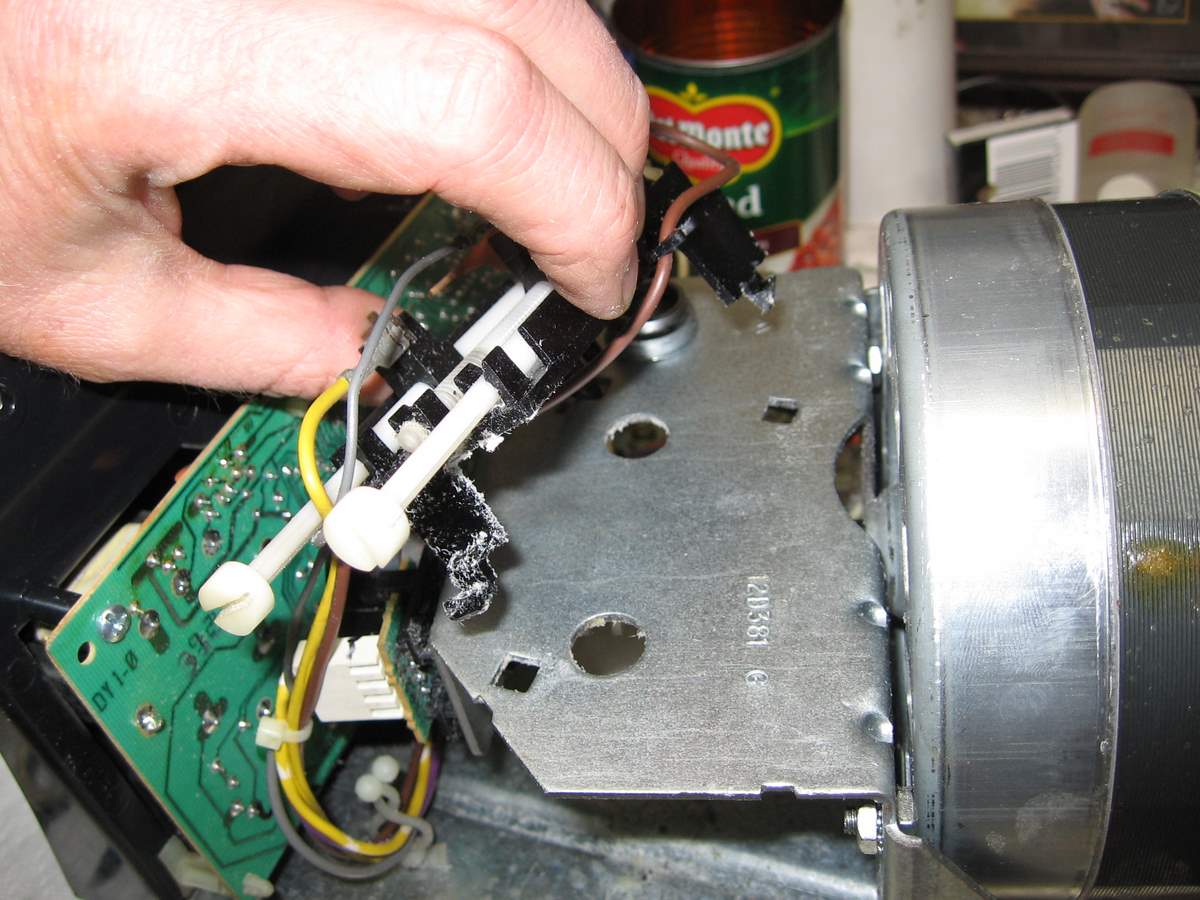
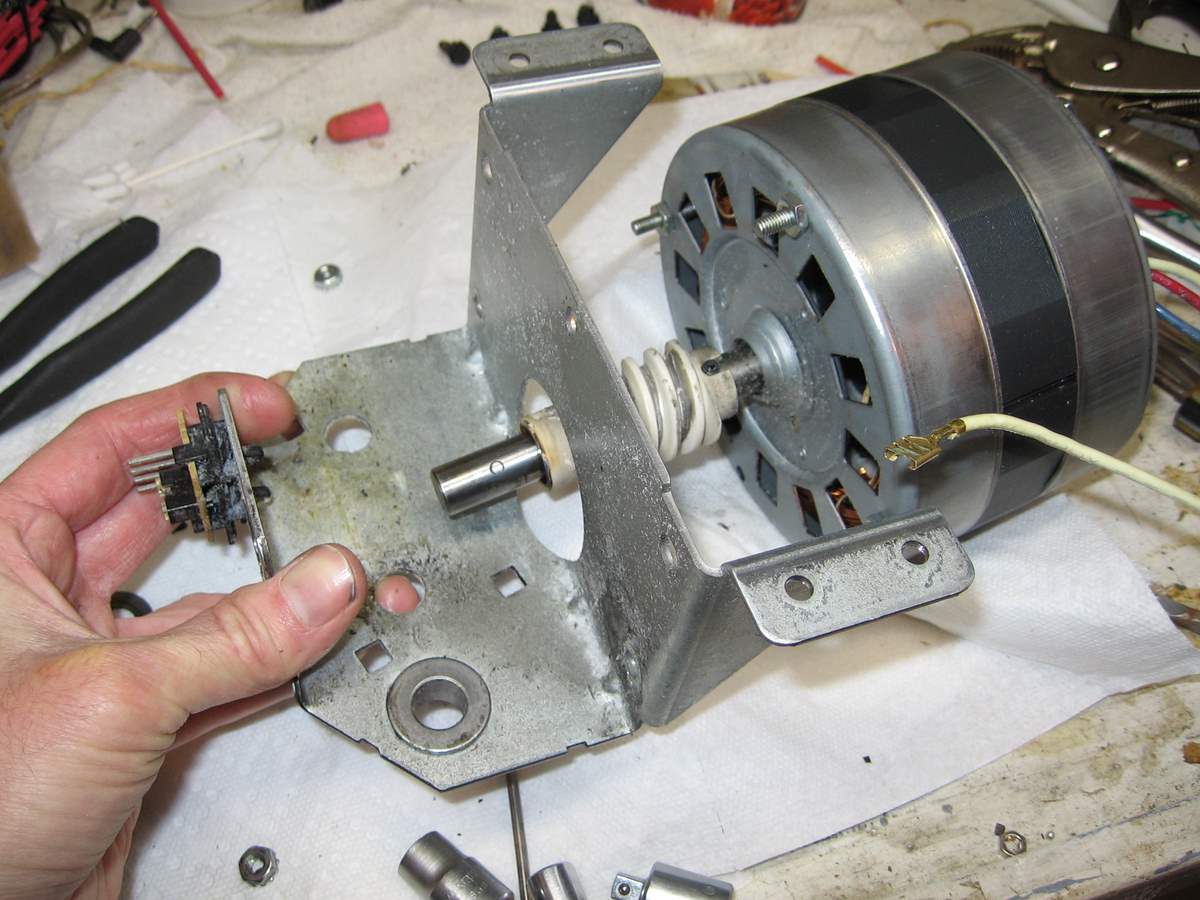
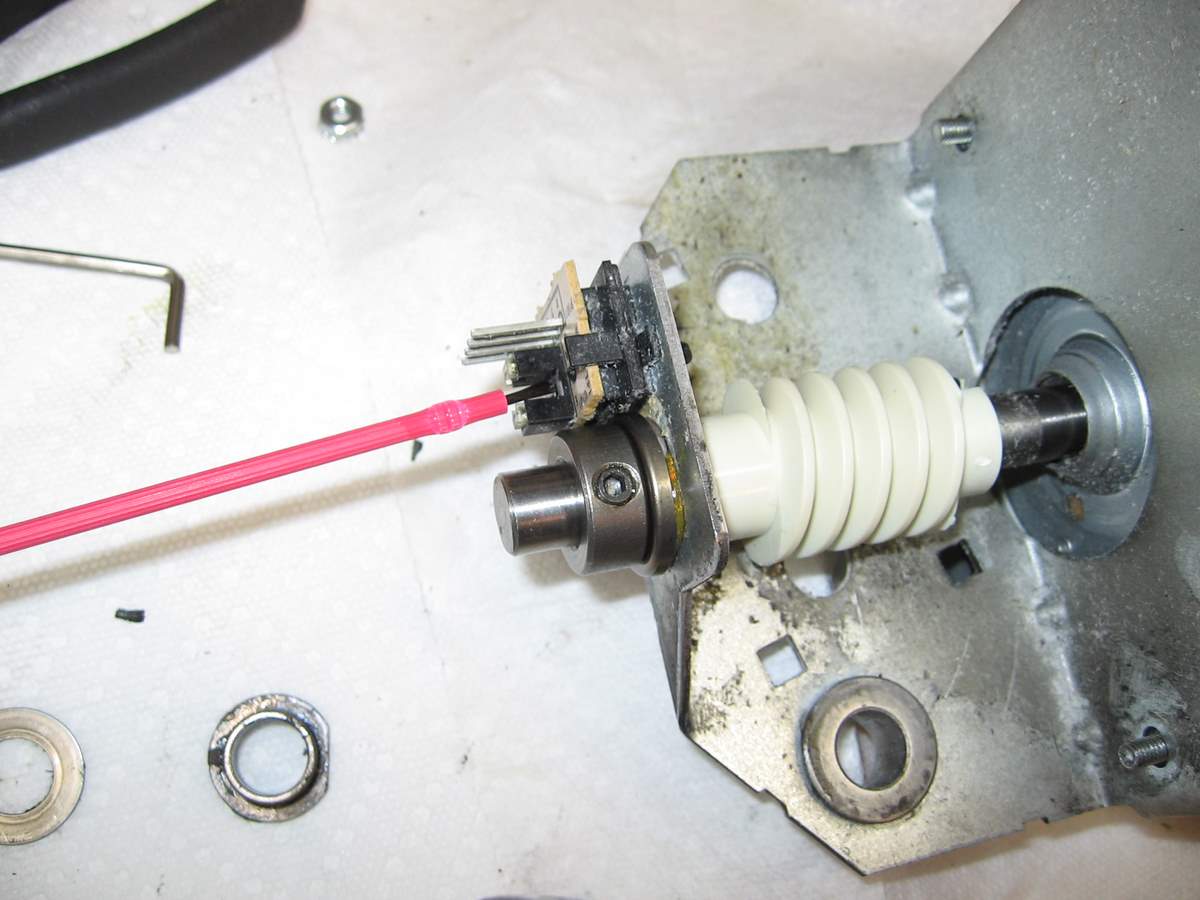
You unclip the mechanism that controls the travel limits, it is this
part. Little worm gears that cause copper contacts to close at each end
of their travel.
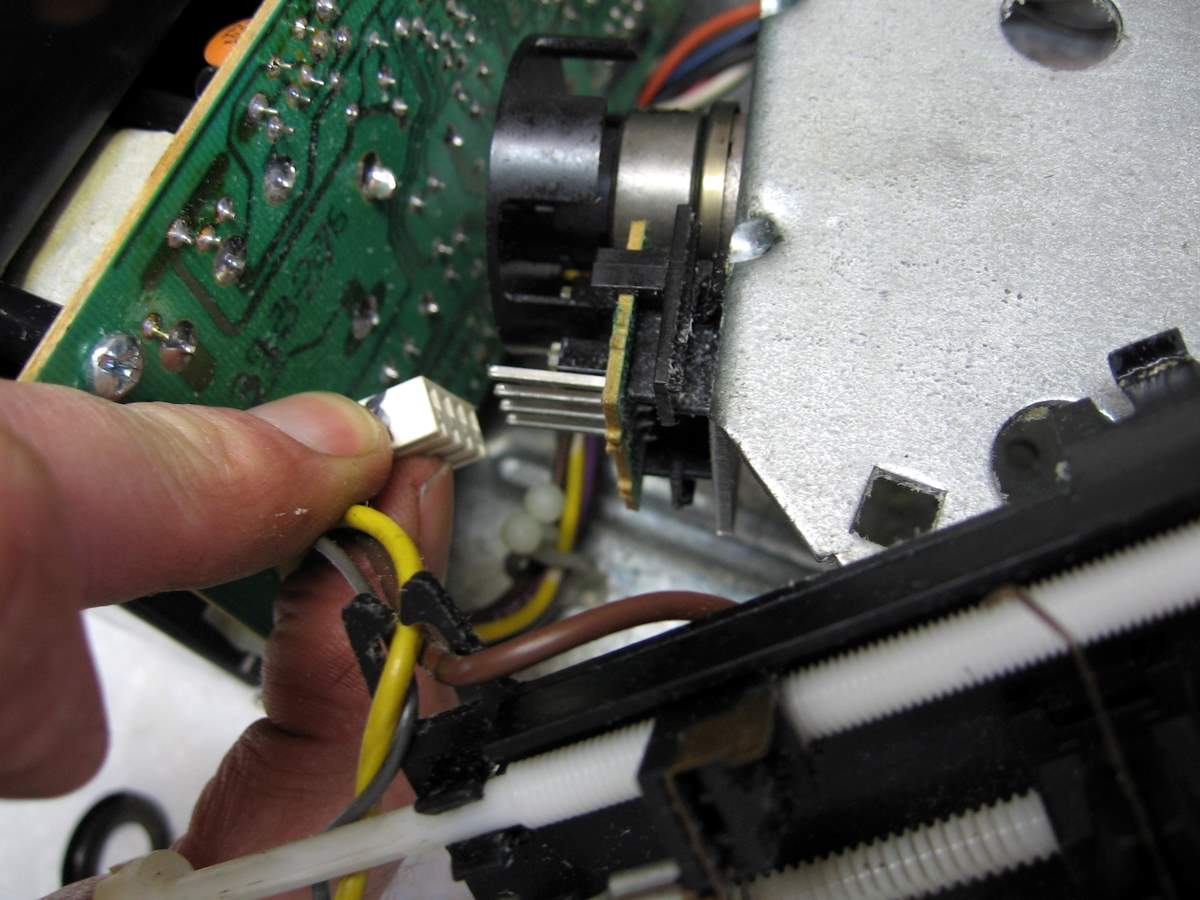
You have to unplug these wires that go to the "RPM Sensor" at some
point:
Then it unsnaps from the plate it sits on, just press the tabs.
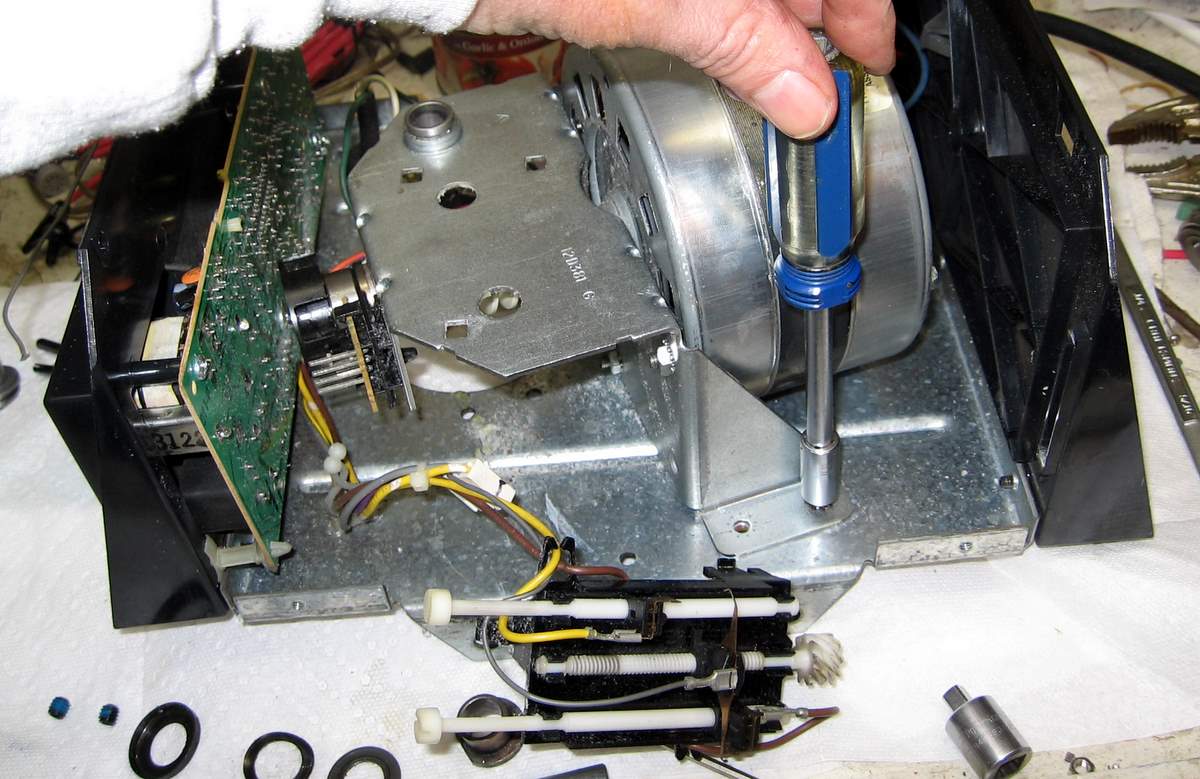
Let it rest to the side. Now you have just the motor held in by a
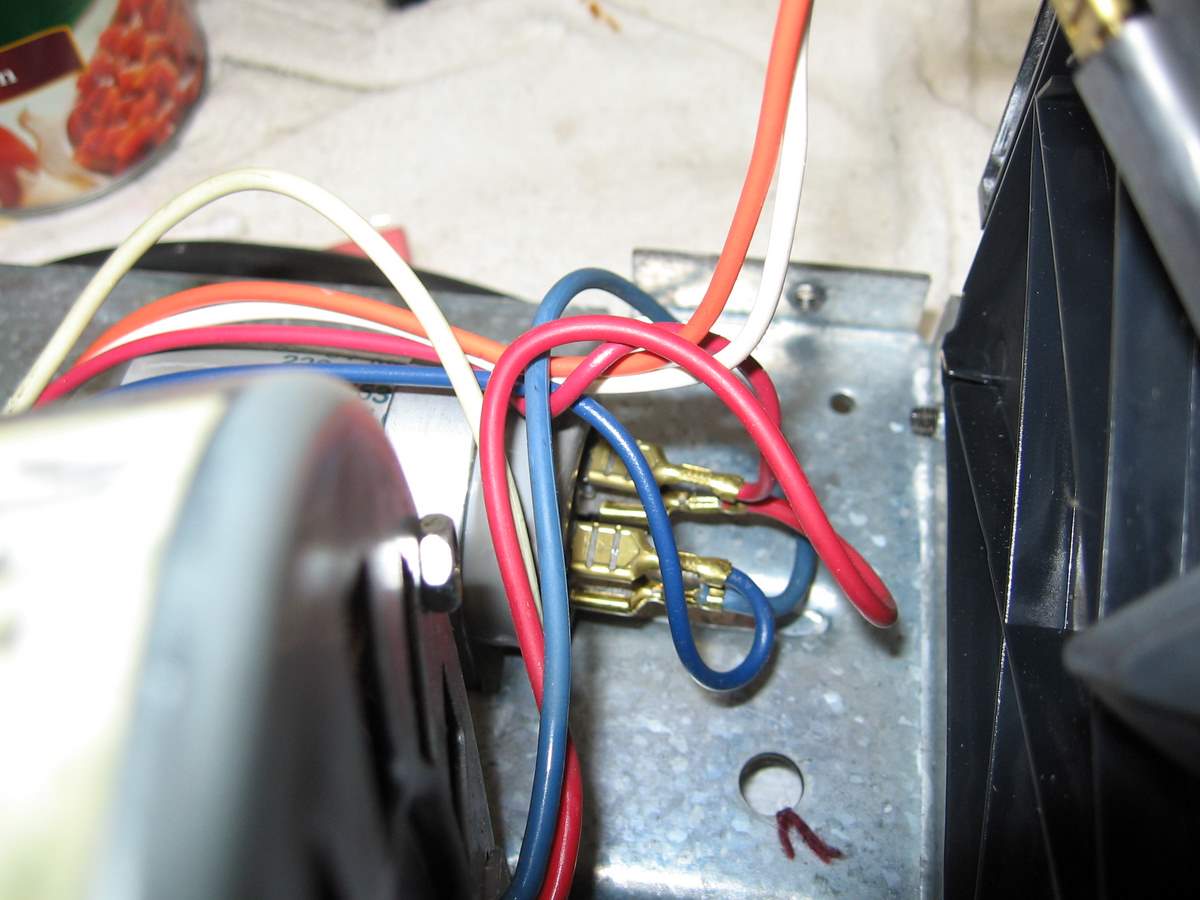
few screws, and the wires can be unplugged. They are all color
coded, so you can easily tell, you re-connect red to red, etc.
Next few pics:
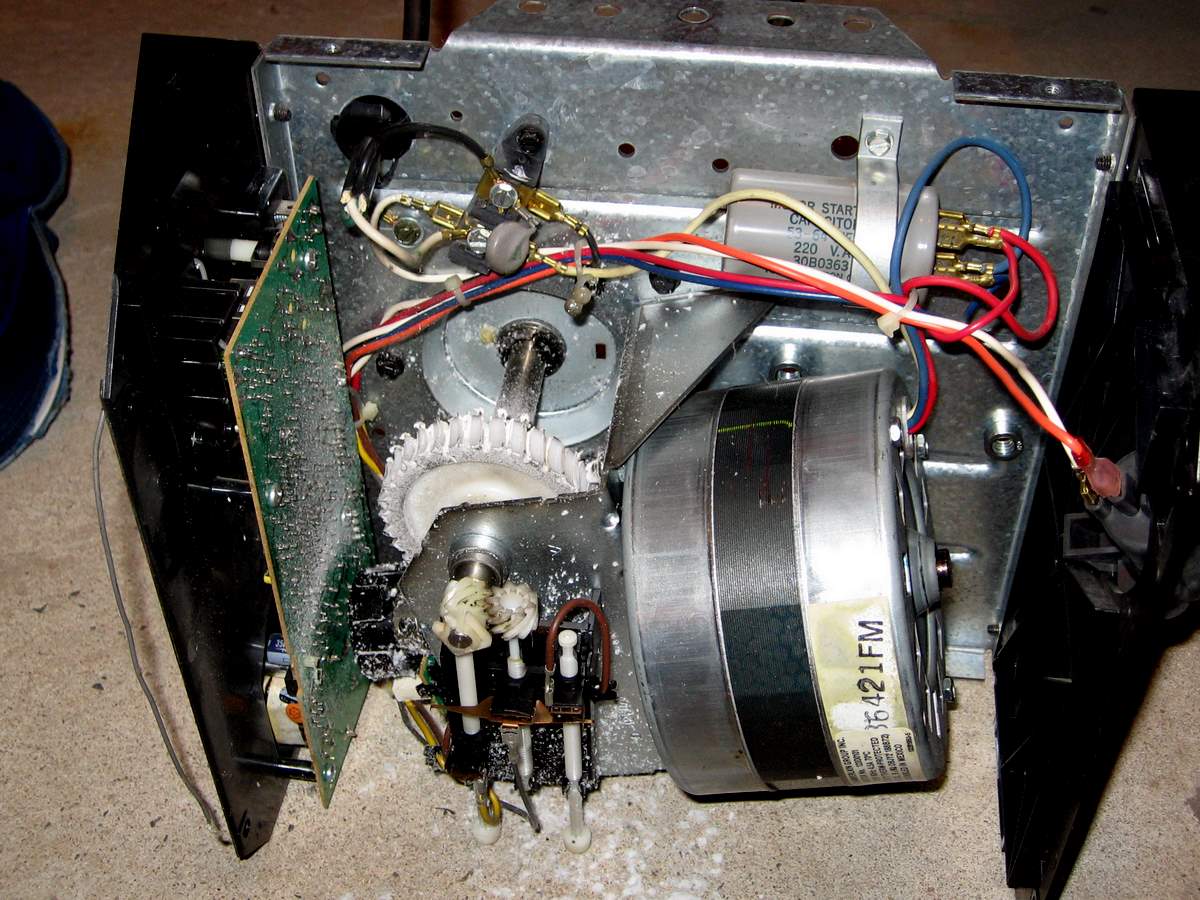
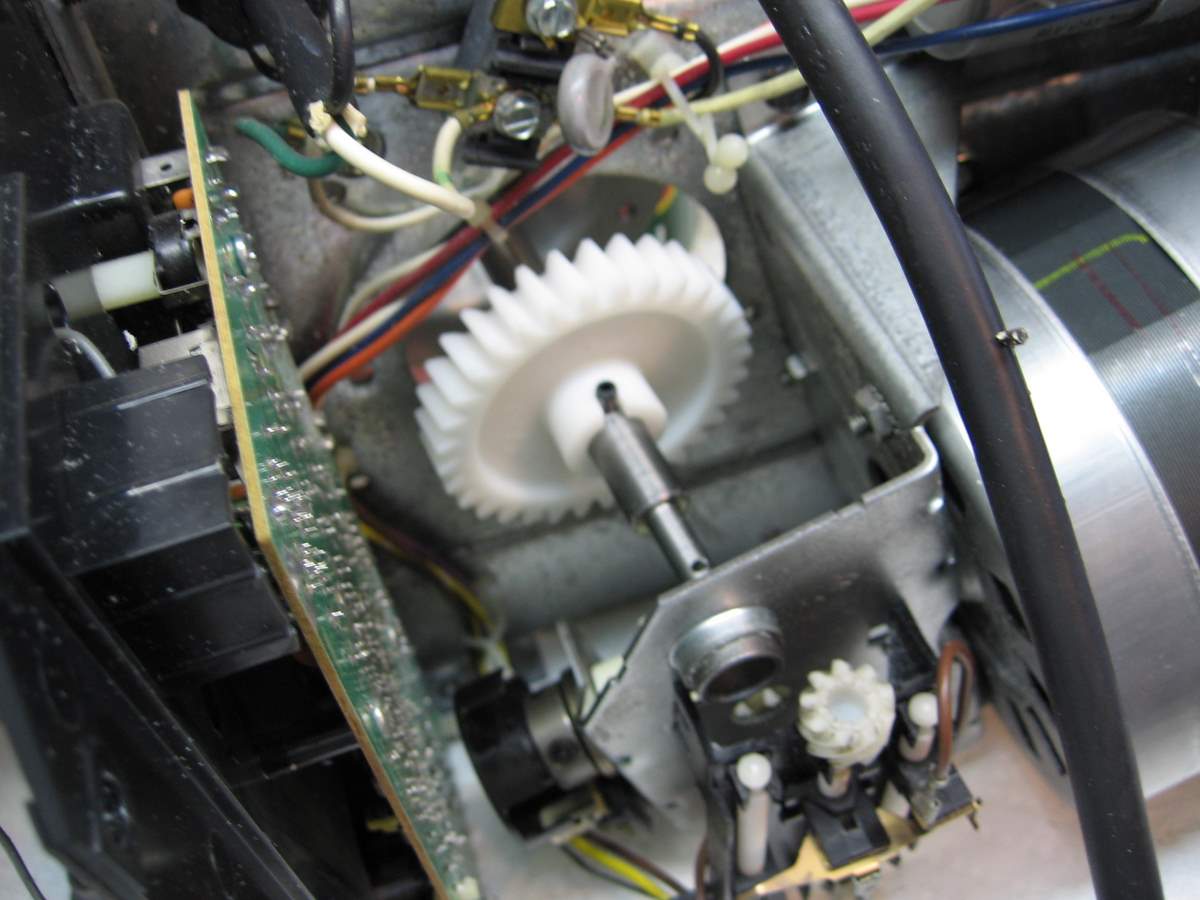
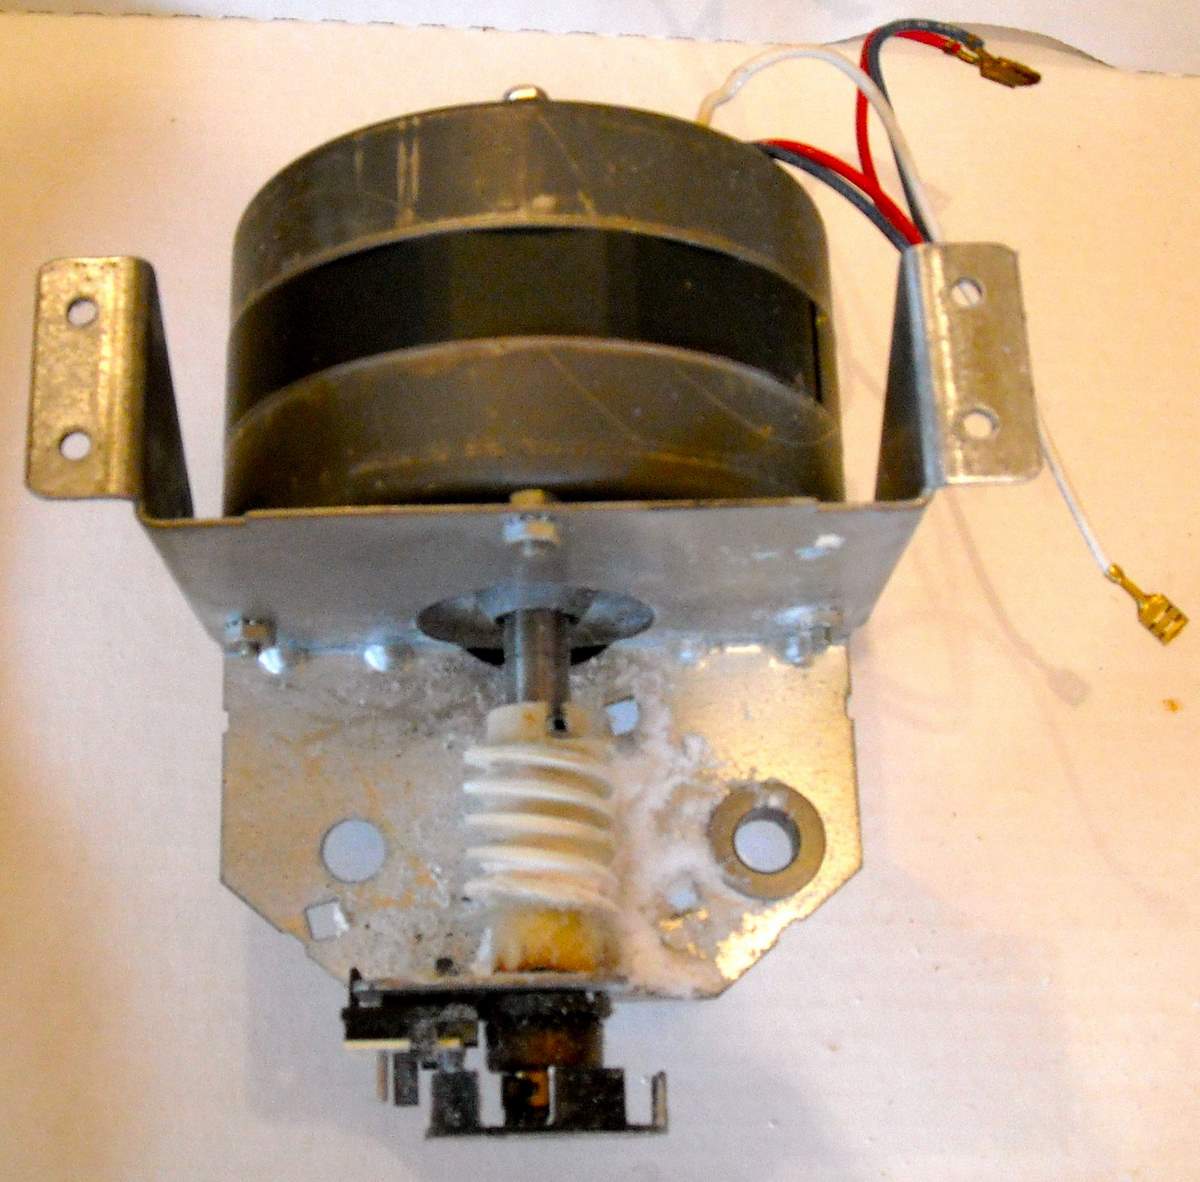
You will unplug the motor wires here:
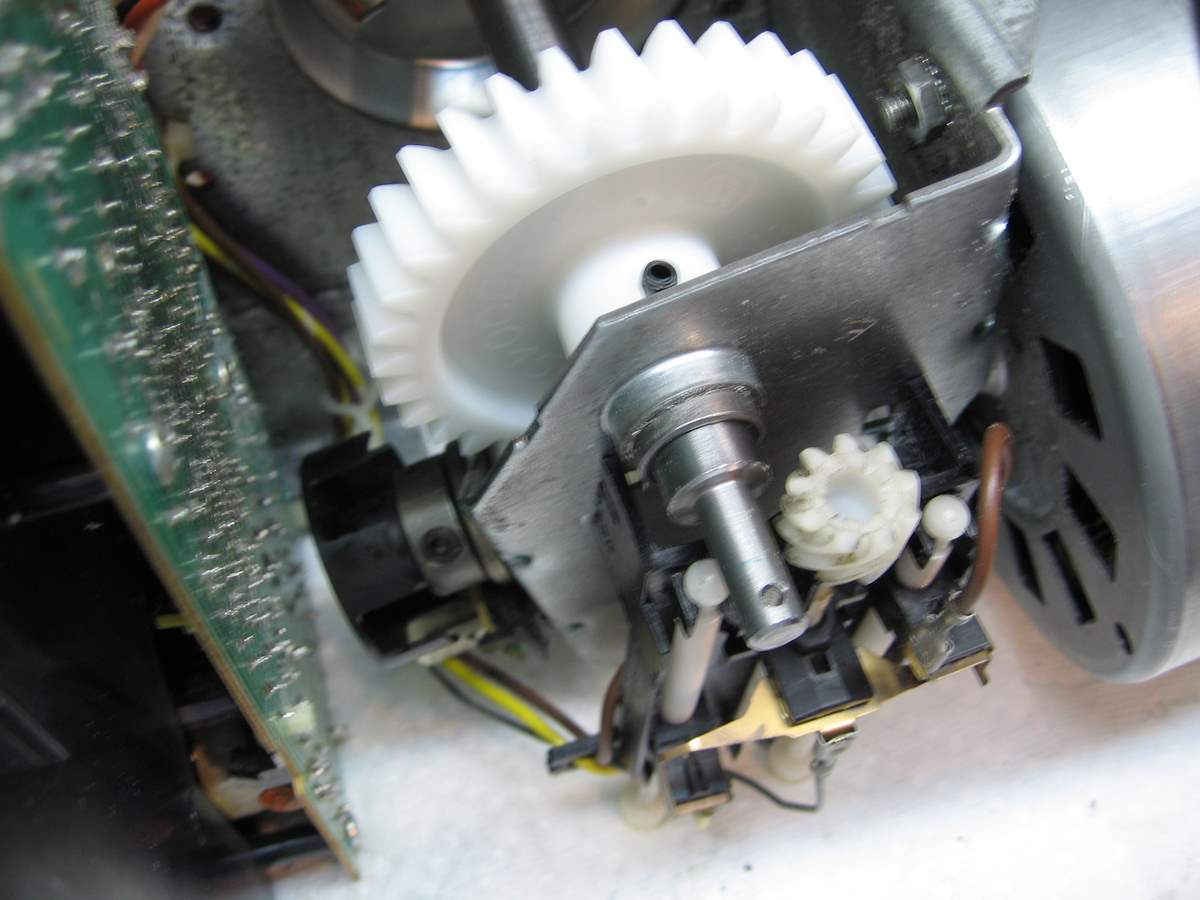
Once you lift out the motor, this will be what is left in the garage
door opener case:
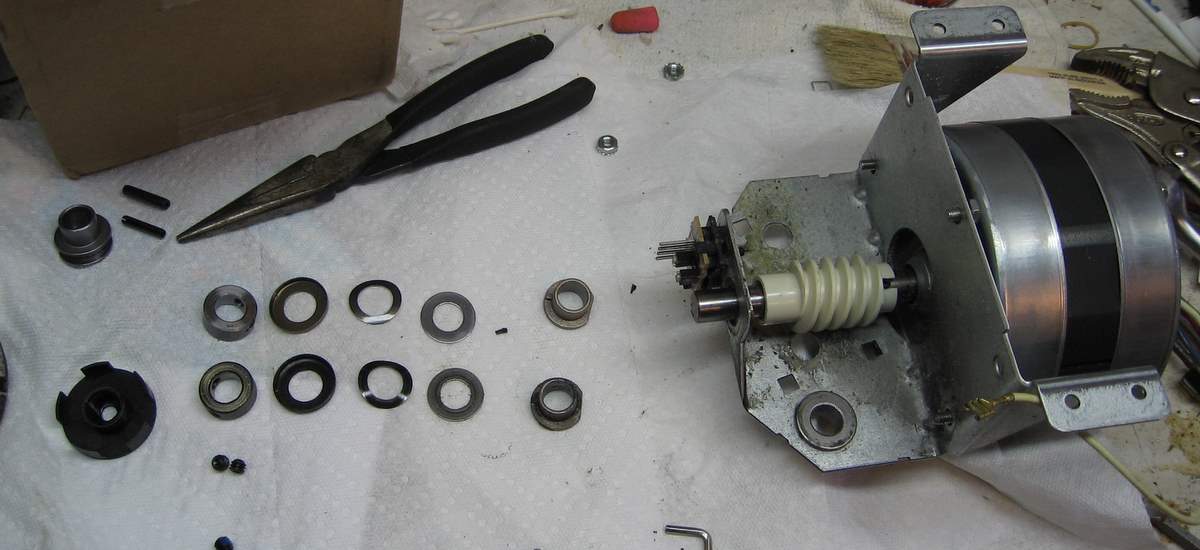
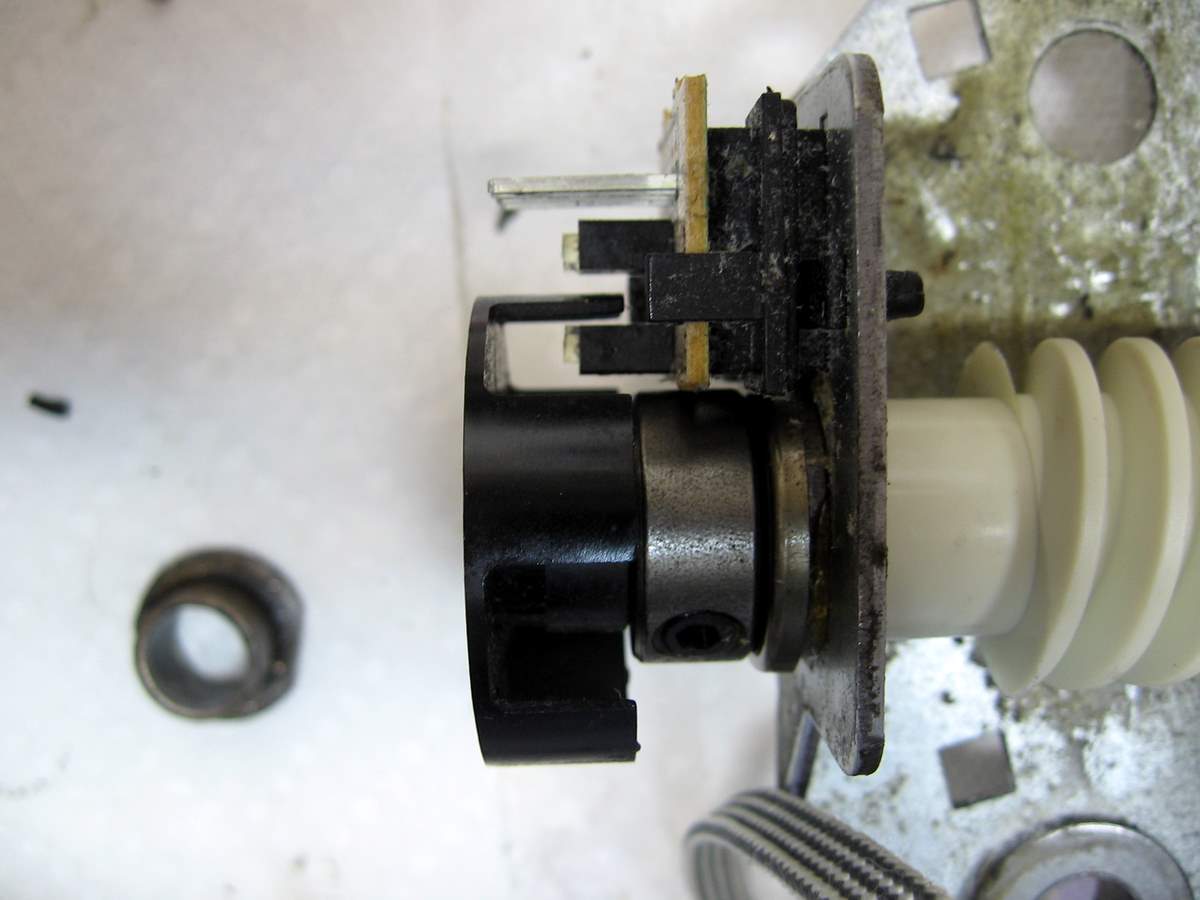
Now, to replace the worm gear, pull off the plastic end, notice how it
rotates it's little splines through that electric eye (RPM sensor).
That is how your lifter knows it is rotating, and this must be put
back on and connected, and the electric eye clean. Anyway, pull
off the black plastic end of the shaft the worm gear is on, then unscrew
the allen screws and pull off the rest of the end bearing and cap etc.
IMPORTANT POINT! Reading other people's experiences, this is where
you want to lay out the pieces as you remove them, in order, and line up
the new parts in the same order. It is the only way to know you
put it back together right. Below:
old parts lined up as they came off, new parts ready to slide on, after
I put on the spankin new white worm gear. It just slides on.
You may have trouble sliding the bushings and parts over the motor
shaft, or find it hard to slide the old parts off. I had to file a few rough spots on the
motor shaft with a flat file. Didn't take too long.
If you force these thin
bushings they can break, so file the shaft if they won't slide
off.
Put all those pieces back on, grease the shiny bearing parts, and when
you put the black cap on the end, clean the electric eye and make sure
the tines pass through it: Below:
Cleaning the electric eye with a small paint brush:
And the black cap back on the end: (the splines MUST pass through the
eye like you see here)
Tips:
Attaching the
mounting flange of the new gear
/ sprocket shaft assembly
to the top of the garage door closer can be difficult. The
pre-drilled holes in the flange of the gear
/ sprocket shaft assembly may only line up properly in one specific position, meaning you may
have to rotate it and look through the little screw holes for the best
alignment. Also, the holes in the new flange are not threaded
and the threads will be cut by the screws as you put them in.
This makes the screws turn really hard the first time, so try them in
the holes and turn them in with a wrench before you are trying to do
it over your head. Put the screws in, then of course you will
need to take them back out to mount the gear / sprocket shaft assembly
from below, but at least now the screws will go in easier and
straighter. (this tip was suggested by a reader)
Keep the electric motor shaft fully seated. It can kind of swim
fore and aft when the gears and all are off. You can see by the
wear and dirt how far it protruded before, just get it back like it was.
If you look back at the pic with the pink arrows,
you can see the butt end of the electric motor shaft barely protrudes
out of the back of the motor.
I'd recommend turning the little travel limit screws a few turns so the
opener won't try to travel as far the first time you run it. Try
to take it all apart with the door and closer in the fully closed
position. But if you couldn't, set those limiters way down, you
can always open them back up once you see where the door wants to go
when you try it the first time. Also, see the scanned in
instructions further down that talk about setting the travel and limits.
Another tip sent to me from a reader (feel free to send me more):
One
or
tips you might want to add;
After
sliding
the gear assembly in from the top, and before you insert and tighten
the screws, make sure the sprocket cover slots on the top are
aligned correctly. (I think he's referring to
same as the first "tip" a few lines up, "slots" or screw holes the same I
think.)
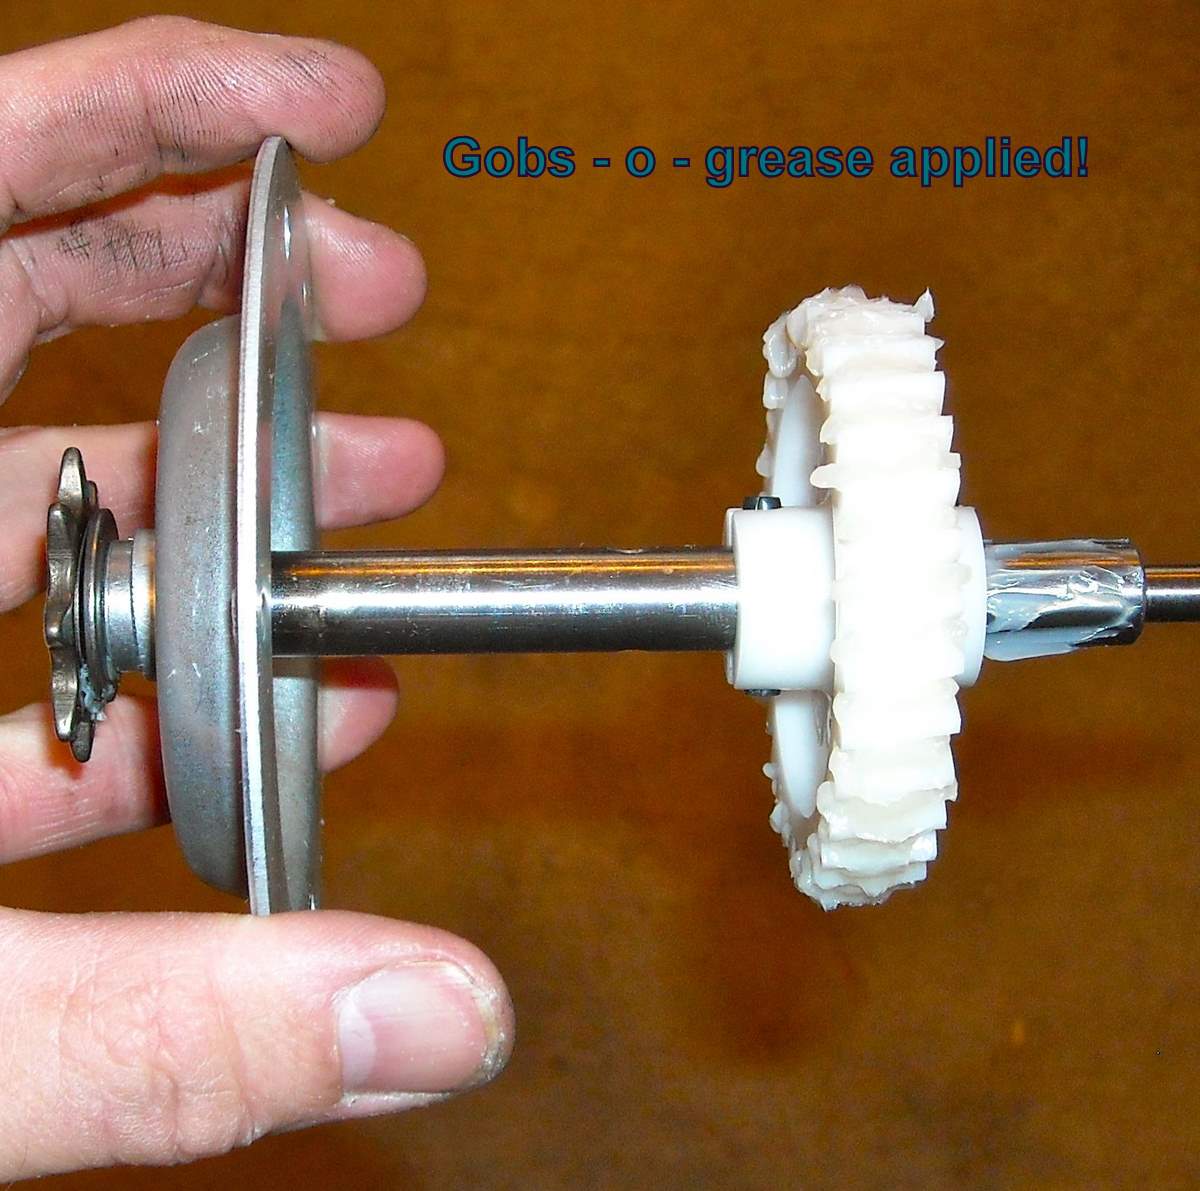
Grease the gears
with the supplied grease.
The worm gear replacement is
the harder part, and in my case, not the gear that was really
torn up.
The gear kit is readily found on the internet, shop around for the
liftmaster part number 41C4220A:
For larger diagram below, right click, "view image", then click the
little "+" sign, should get you full size.
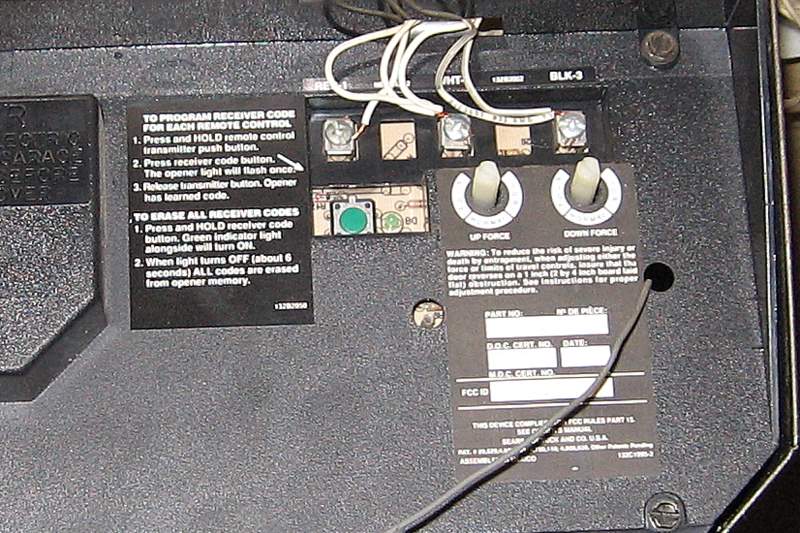
If the light on the back here is flashing a code, and you are having a
problem making the opener work right, here is what the flashing codes
mean:
# of flashes
1 The Protector System wire open or totally misaligned
2 The Protector System wire shorted or black/white wire
reversal
3 Door Control or Multi-Function control Panel wire shorted
4 IR sensor slightly misaligned (dim or flashing sensor LED)
5 Motor overheated/Possible RPM sensor failure -- unplug to
reset
6 Motor circuit failure -- replace RX/LX board
7 Rapid Flashing - Chamberlain transmitter with the correct
format code being received
(opener not necessarily programmed to
respond)
THE FOLLOWING SECTION IS FOR GEAR 41A2817
REPLACEMENT ONLY
OK, I don't want this to get confusing, but
here are the written instructions if you want to ONLY replace the
stripped, large gear, the 41A2817 and the worm gear. You have to get
the gear on and off the old shaft and re-use it. I did not do
that, but I wanted to give the instructions to you below. Again,
so you can decide if this looks like something you want to do.
Personally, I don't
think the cost savings is worth the hassle of re-using the
shaft, chain sprocket, old bearings. And those roll pins would
not come out for me!
Here is what you need if you want to pound out the roll pin
(part "G" in the diagram below) that holds the gear in place (click here, it explains what tool you need, a 5/32"
punch or similar).
chamberlain / liftmaster / sears / gear kit
041C4220A garage door opener parts and repair For more information, try the suppliers in the google box at
the top of this page first and support my effort to put up this help
page. Thanks!
Now that you have the opener all repaired and working like new, get
another remote control for your other car, neighbor that feeds the
cat, etc. Here's the info to get a cheap remote for this opener.
ADDENDUM:
Doing
the replacement without taking the garage door closer down from
overhead.
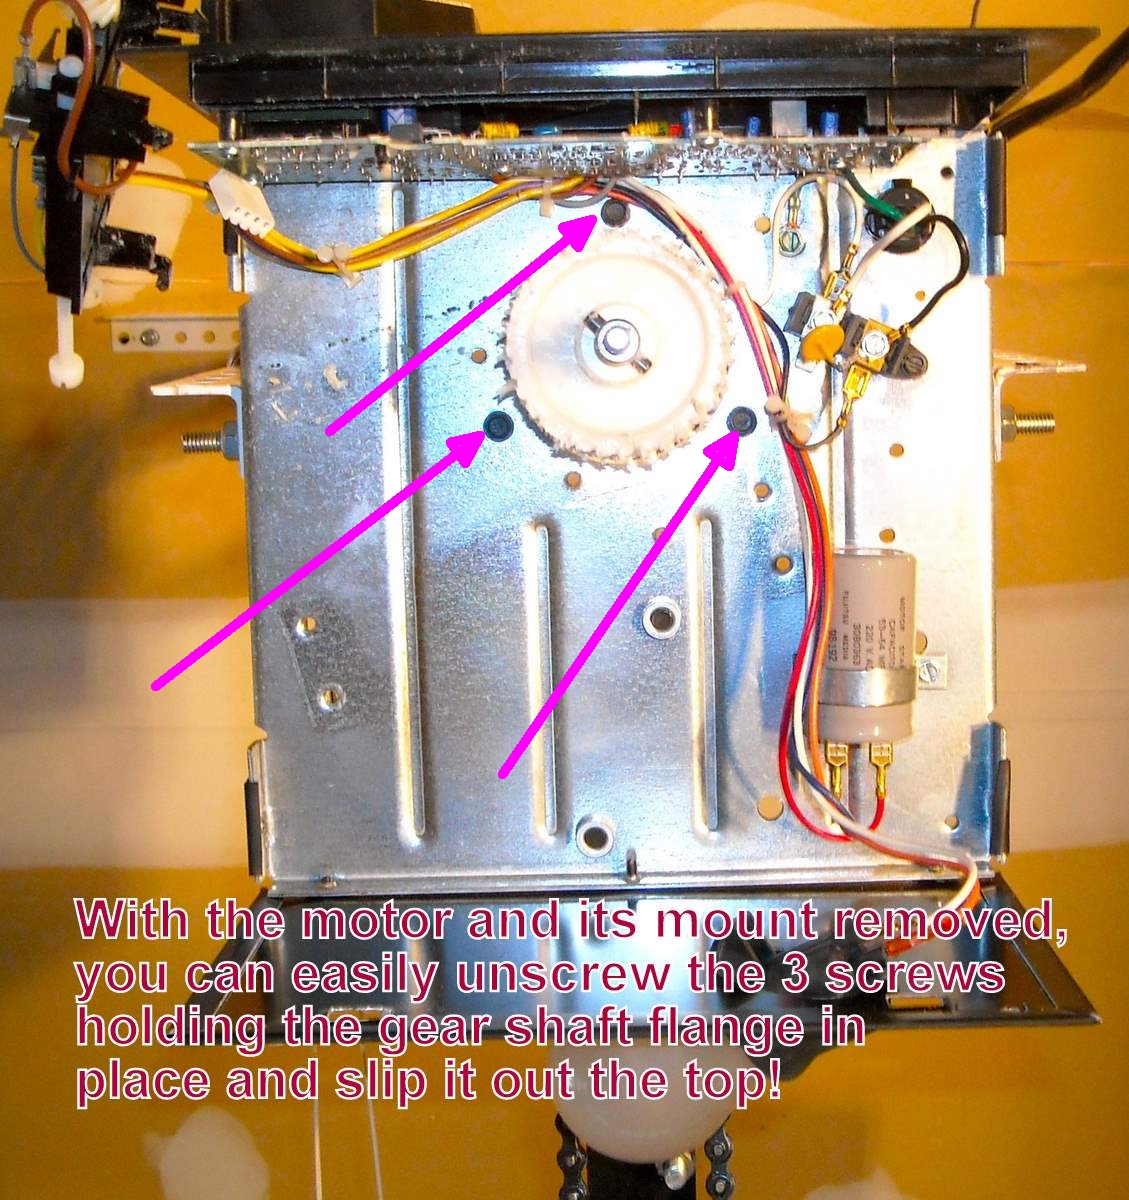
A helpful reader e-mailed
me some photos I am adding. He removed the motor first, then
had easy access to the three screws holding the flange of the
041C4220A gear kit. Here's his helpful photos with my
narration. He was able to replace the gears with the garage
door opener up overhead the whole time. This is the way to do it
if you have room above the garage door opener:
Again, lots of plastic shavings will be found when you open the
case up.
Remove the little clip, slide off that small gear on the end of the
shaft.
Unclip and remove the limiter switch assembly and let it hang out of
the way.
Disconnect the motor wires as discussed earlier, and undo the 4 screws
that hold the motor in place. Careful it doesn't fall out on
your head.
Now you will have excellent access to
the 3 screws that hold in thethe flange of the 041C4220A gear
kit.
Take out the old worn out gear and shaft out the top, screw in the new
one (see the tip about starting the screws and removing them then try
doing it overhead, it will go in easier), and decide if you want to
replace the worm gear too. That is covered fairly well earlier,
but with the motor out in hand, you can do that on your work bench.
The gear kit as it will arrive, and all greased up ready to slide in:
If we've helped you out, try these ads, it supports pages like this
one!
Tools needed for this repair:
* 1/2" wrench or adjustable wrench or pliers
* 3/8" Socket or Nut Driver
* 1/4" Socket or Nut Driver
* 5/16" Socket or Nut Driver
* Flat Standard Screwdriver and if you plan on driving
out the roll pins to just replace the 41A2817 gear only, you need:
* 5/32" Punch or similar
* Hammer
I believe it is the same repair for all the
following garage door opener models, from 1984 to present:
Chamberlain 1100,
1200, 2100, 2200, 4100, 4200, 4893OD, 5100, 6200, 710WHC, 711WHC, 7200,
7220, 7320, 7420, 7520D, 8100, 8100M, 8200, 9200, CG40, CG40D, CG42D, CSO,
HD200D, HD600, PD100, PD200, PD210, PD210D, PD212, PD212D, PD600, PD610,
PD610D, PD612K, PD612KLD, PD752, PD752D, PD758D, PD758S, WD822K, WD822KD,
WD822KS, WD912K, WD912KS, WD922K Raynor 2245RGD, 2595RGD, 2585RGD,
2280RGD, 2265RGD, Pilot, Aviator, Edeavor, Navigator. Fits these
Liftmaster Models: 985, 1240, 1240R, 1245, 1245R, 1245LK, 1246, 1246R,
1250, 1255, 1255R, 1256, 1256R, 1260, 1260LK, 1265, 1270, 1280, 1280R,
1345, 1346, 1356, 215WD, 220WD, 2245, 2255, 2265, 2565, 2280, 2575, 2580,
2585, 2595, 315WD, 320WD, 3245, 3255, 3265, 3280, 3575, 3585, 3595,
ATS211, ATS211R, ATS211X, ATS2113X All Sears Craftsman chain and belt
drive models 139.53990, 139.53992, 139.53914, 139.53985, 139.53930,
139.53635, 139.53964, 139.53660, 139.53920, 139.53939, 139.184050,
139.18803, 139.18805, 139.18814, 139.18830, 139.18850, 139.18851 and all
chain and belt operators from 1984 to present.
Here is a pretty quick and decent video I found that shows how
to do many of the steps. No sound, and only
changes the main gear. Shows how to pound that roll pin out
though! In the video, they remove the motor completely to get
to the 3 screws holding the gear assembly in, but if you are trying
to do this without taking the garage door opener down, try and get
to those screws from the side with a small boxed end wrench or
socket, and just pull the gear assembly out the top!